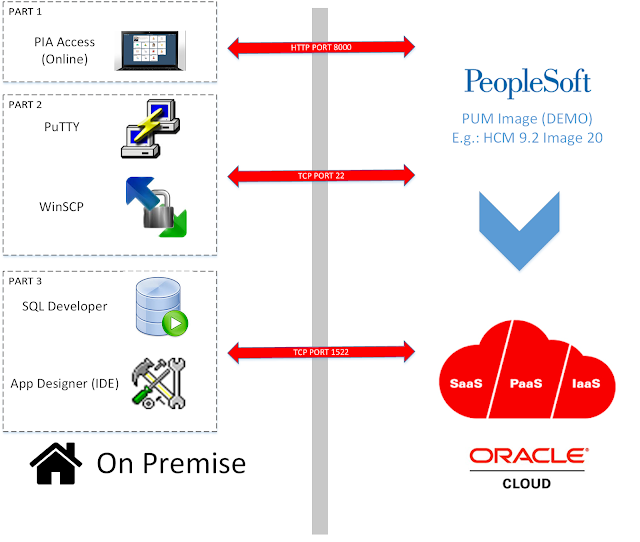
In this third and final part, I will demonstrate how to access the demo instance (PUM image on OPC) via SQL Developer and App Designer from an on premise workstation.
Step 1: Create Security List for database access and add to the instance
Create Security IP List:
Oracle Compute Cloud Service console > Network tab > Security IP Lists > Create Security IP List
Enter the public ip address(es) of your on premise workstation(s). This will ensure that only a trusted list of on premise ip addresses can access the database (via SQL Developer/App Designer) of your demo instance (PUM image running on OPC).
Note: If you are not sure of the public ip address of your on premise workstation then simply visit https://whatismyipaddress.com/ using a browser on the workstation.
Create Security Application:
Oracle Compute Cloud Service console > Network tab > Security Applications > Create Security Application
Create a Security Application to open TCP port 1522 to allow database access. You might wonder how I figured the database for the demo instance is using port 1522? We can find it in the tnsnames.ora file located in /opt/oracle/psft/pt/tools_client/ which we can access via WinSCP (refer: Part 2).
Create Security List:
Oracle Compute Cloud Service console > Network tab > Security Lists > Create Security List
Create Security Rule:
Oracle Compute Cloud Service console > Network tab > Security Rules > Create Security Rule
Using the Security IP List, Security Application and Security List that we just created, create a Security Rule as follows:
Add Security List to Instance:
Oracle Compute Cloud Service console > Instances tab > View > Under "Security Lists" > Add to Security List
In my example, the security list that I added is called 'psftuser_sec_list_1522'.
Step 2: Installing Oracle and PeopleTools Clients (SQL Developer and App Designer)
Hypothetically, if we had installed the PUM image locally and if we did not already have the Oracle and PeopleTools clients installed on the local workstation, then we would have mapped the samba drive and installed the clients from there.
I was not able to figure out how to map the samba drive of the demo instance (PUM image) running on OPC to an on premise workstation. The alternative/workaround is to connect to the instance on OPC using WinSCP from the on premise workstation (as described in Part 2), download the relevant folders locally and install the necessary clients.
We can find the content of the samba drive under the following location using WinSCP:
/opt/oracle/psft/pt/tools_client
Step 3: Updating the tnsnames.ora file in the on premise work station
Find the database name of the instance:
Login to the instance online and navigate to the following page:
Navigator > PeopleTools > Lifecycle Tools > Update Manager > Update Manager Dashboard > Update Manager Utilities > About PeopleSoft Image
Add database to the tnsnames.ora file on the on premise workstation:
For a typical Oracle client installation, the tnsnames.ora file can be found in the following directory:
C:\oracle\product\12.1.0\client_1\network\admin
TNS Details:
HOST: Enter the public ip address of your instance
PORT: 1522
SERVICE_NAME: Enter the database name of your instance which we determine in the preceding steps
<ENTER_DBNAME> =
(DESCRIPTION =
(ADDRESS_LIST =
(ADDRESS = (PROTOCOL = TCP)(HOST = <ENTER_PUBLIC_IP>)(PORT = 1522))
)
(CONNECT_DATA =
(SERVER = DEDICATED)
(SERVICE_NAME = <ENTER_DBNAME>)
)
)
For Example:
Step 4: Access OPC instance via SQL Developer from on premise workstation
Default Username/Password: SYSADM/SYSADM
Connection Properties:
Successful Connection:
Step 5: Access OPC instance via App Designer from an on premise workstation
Note: The default connect id and password is the same as people/peop1e
If you have not configured the default connect id/password then you can do so using Configuration Manager.
The PeopleTools client installation should be in your C drive.
For example: C:\PT8.55.11_Client_ORA\
We can find Configuration Manager (pscfg.exe) and App Designer (pside.exe) in the following location:
C:\PT8.55.11_Client_ORA\bin\client\winx86\
Connect via App Designer:
Use the database name of your OPC instance which we determined in the preceding steps.
Successful Connection:


