In my previous blog posts, we saw how we can brand PeopleSoft applications which are on PeopleTools 8.55 using the new Theme Macro Sets functionality (Part I and Part II). The Theme Macro Sets provides a great way to override targeted styles (e.g.: Header Logo, Icon images, background colors, etc.) using online configuration. The delivered Them Macro Set contains 177 macros which targets specific styles for some common Branding tasks.
Creating Custom Macros:
The concept and functionality of the Macro Set are great, but what if the 177 macros that are available do not meet our requirements? In Part II, I demonstrated how we can fall back to using the Theme - Fluid Global Override Style Sheet under such circumstances. In this section, I will detail how we can still bring those custom style sheet overrides into the Theme Macro Set as custom macros. Once we create the macros, we don't need to update the style sheet anymore. All we need to do is update the macros if there are any further changes (I guess making it a little user friendly depending on who is making the changes). This is particularly useful for customers who have a more dynamic branding which changes frequently depending on the time of the year vs being static after implementation.
Macros in Theme Macro Sets are nothing but variables used in the Theme - Fluid Global Override Style Sheet which are substituted at runtime.
Going back to my example in Part II, we used the following styles in the Theme - Fluid Global Override Style Sheet for changing the Dot Styling on the Fluid Landing Page Footer:
.lpfooter .dot.on {
background: #EEEB4D;
}
.lpfooter .dot {
background: #E8E29E;
border: 2px solid #1d418c;
}
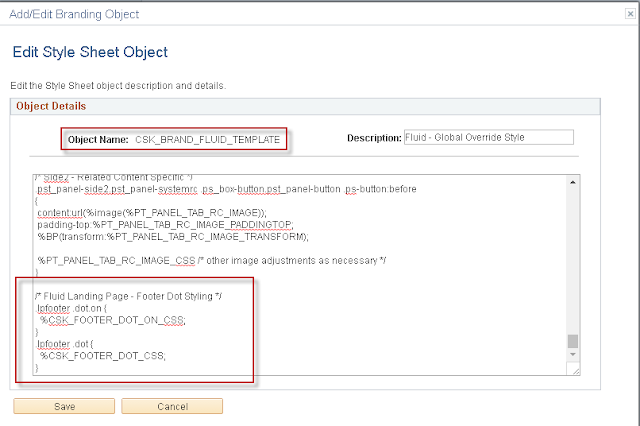
Let us re-write the above styles using custom variables (macros).
NavBar > Navigator > PeopleTools > Portal > Branding > Branding Objects
Edit the custom Fluid - Global Override Style Sheet (CSK_BRAND_FLUID_TEMPLATE) and update the styles as follows:
.lpfooter .dot.on {
%CSK_FOOTER_DOT_ON_CSS;
}
.lpfooter .dot {
%CSK_FOOTER_DOT_CSS;
}
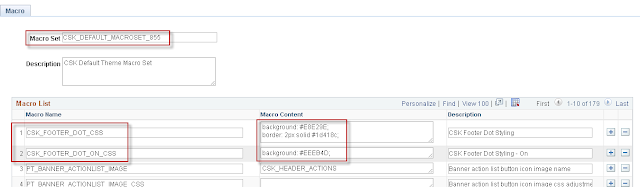
Now, let us add these macros (variables) to our Theme Macro Set:
NavBar > Navigator > PeopleTools > Portal > Branding > Theme Macro Set
Select the custom Theme Macro Set and add the custom variables in the 'Macro List' grid:
Results:
Similarly, we can add other Fluid Style Sheet overrides as custom macro definitions if necessary.
Moving along, the rest of this blog details some advanced branding tasks which can be done in PT 8.55 similar to PT 8.54. I am posting links for those items here for continuity.
Creating an environment specific header for Non-Production databases:
Fluid Housekeeping Steps: Fluid Branding - 8.54 - Part 5B
Task steps: Fluid Branding - 8.54 - Part 5C
We will notice that the above steps would only work for the "Fluid" pages. To make it work on "Classic" pages, we need to perform some additional steps.
Step 1: Update the javascript to modify the jQuery selectors
// Display Database Name using jQuery once the document is ready;
var $jq1 = jQuery.noConflict();
$jq1(document).ready(function(){
// Make sure we are only adding the div once;
if ( $jq1("#cskdbnamecontainer").length === 0 ) {
// Add div to display DB Name;
$jq1( "#PT_HEADER, #ptbr_header_container").prepend( "<div id='cskdbnamecontainer' align='center'><span id='cskdbname'>Test Environment: %dbname</span><a href='#' id='cskdbnamehide'>Hide</a></div>" );
// Add jQuery to hide the DB Name when the 'Hide' link is clicked;
$jq1("#cskdbnamehide").click(function(){
$jq1("#cskdbnamecontainer").hide();
});
}
});
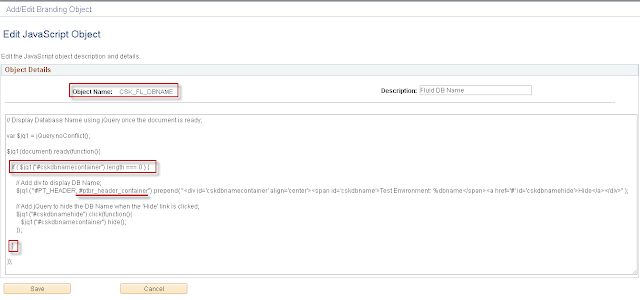
You can see that I added an additional selector (#ptbr_header_container) to the jQuery so that the contained javascript code executes for Classic as well.
Step 2: Inject custom styles into Classic - Theme Style Sheet
NavBar > Navigator > PeopleTools > Portal > Branding > Branding Objects
Append the following styles to CSK_BRAND_CLASSIC_TEMPL_FLUID
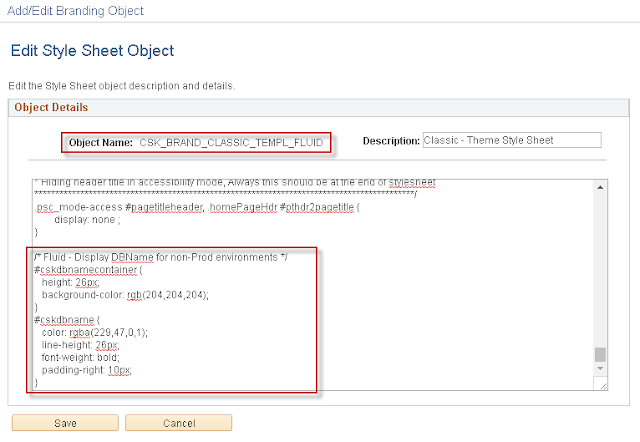
Custom styles for reference:
/* Fluid - Display DBName for non-Prod environments */
#cskdbnamecontainer {
height: 26px;
background-color: rgb(204,204,204);
}
#cskdbname {
color: rgba(229,47,0,1);
line-height: 26px;
font-weight: bold;
padding-right: 10px;
}
Step 3: Inject the custom javascript into Classic using Branding System Options
NavBar > Navigator > PeopleTools > Portal > Branding > Branding System Options
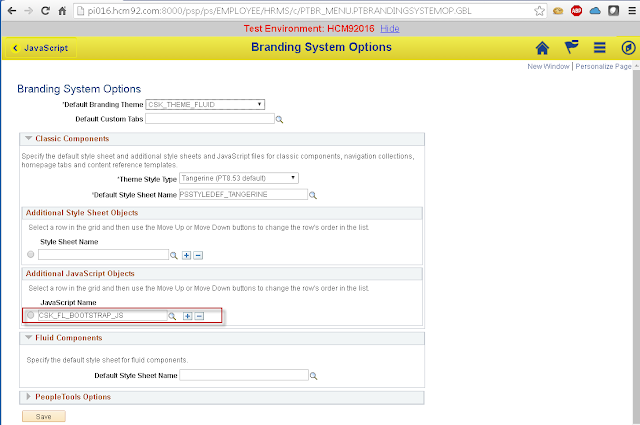
Results:

Adding Custom Links to Actions List Menu:
Fluid Branding - 8.54 - Part 5C
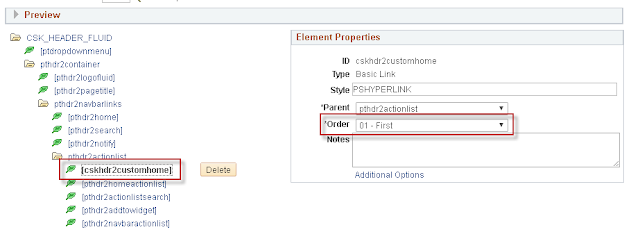
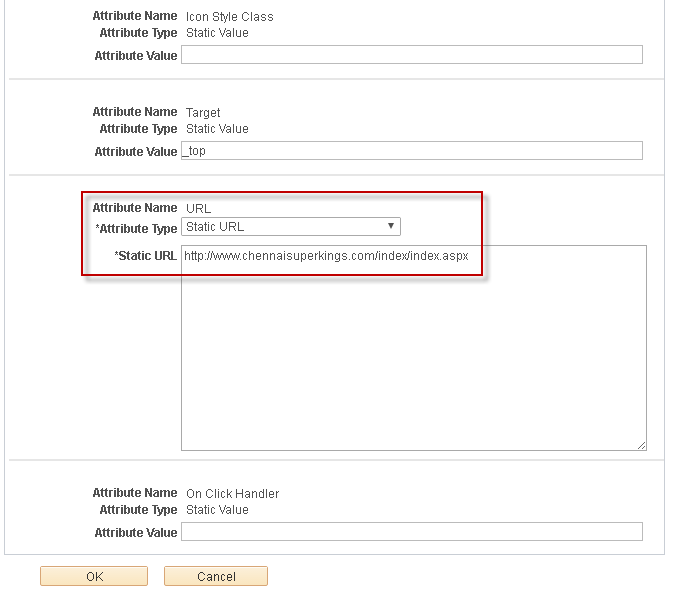
Again, we will notice that the above steps would only work for the "Fluid" pages. In order to add custom links on "Classic" pages, we need to perform some additional steps to update the header definition (CSK_HEADER_FLUID).
NavBar > Navigator > PeopleTools > Portal > Branding > Define Headers and Footers
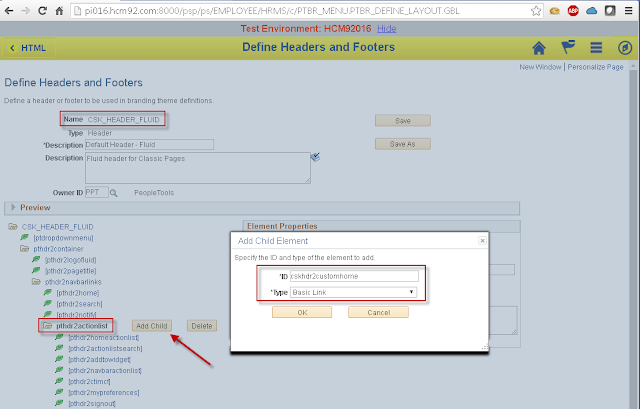

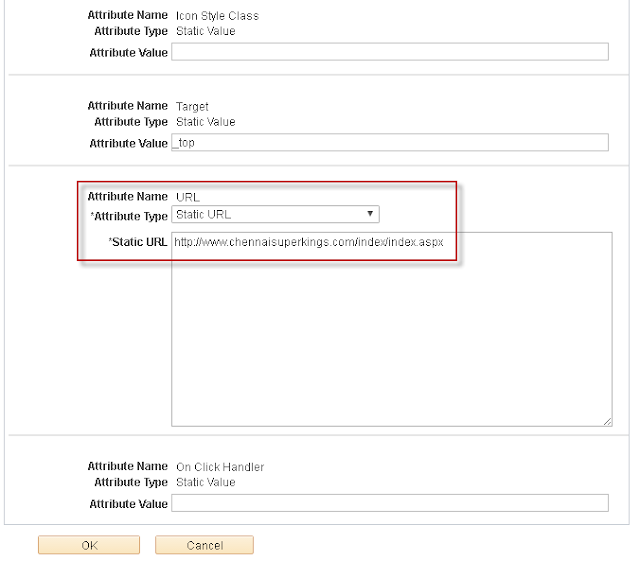
Note: The reason I am using a Static URL as the means to add the custom URL is because the URL object option does not seem to substitute the URL correctly. It appears to be a bug in 8.55.
Results:

Overriding the Favorite Icon:
Fluid Branding - 8.54 - Part 5C
Again, this will only work for "Fluid" pages.
Here are the steps to create a Favorite Icon for Classic Pages:
Step 1: Update custom javascript - CSK_FL_IR_JS
NavBar > Navigator > PeopleTools > Portal > Branding > Branding Objects
Update CSK_FL_IR_JS javascript object as follows:
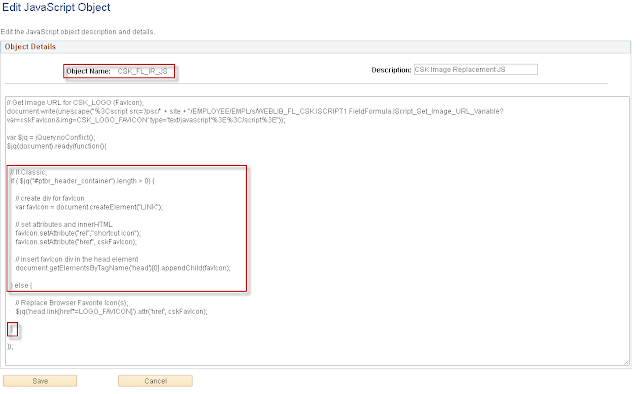
Javascript for reference:
// Get Image URL for CSK_LOGO (FavIcon);
document.write(unescape("%3Cscript src='/psc/" + site + "/EMPLOYEE/EMPL/s/WEBLIB_FL_CSK.ISCRIPT1.FieldFormula.IScript_Set_Image_URL_Variable?var=cskFavIcon&img=CSK_LOGO_FAVICON' type='text/javascript'%3E%3C/script%3E"));
var $jq = jQuery.noConflict();
$jq(document).ready(function(){
// If Classic;
if ( $jq("#ptbr_header_container").length > 0) {
// create div for favIcon
var favIcon = document.createElement("LINK");
// set attributes and innerHTML
favIcon.setAttribute("rel","shortcut icon");
favIcon.setAttribute("href", cskFavIcon);
// insert favIcon div in the head element
document.getElementsByTagName('head')[0].appendChild(favIcon);
} else {
// Replace Browser Favorite Icon(s);
$jq('head link[href*=LOGO_FAVICON]').attr('href', cskFavIcon);
}
});
Results:

Overriding the "Processing" Icon:
PT_PROCESSING_FMODE:

Fluid Branding - 8.54 - Part 5D
Creating Custom Macros:
The concept and functionality of the Macro Set are great, but what if the 177 macros that are available do not meet our requirements? In Part II, I demonstrated how we can fall back to using the Theme - Fluid Global Override Style Sheet under such circumstances. In this section, I will detail how we can still bring those custom style sheet overrides into the Theme Macro Set as custom macros. Once we create the macros, we don't need to update the style sheet anymore. All we need to do is update the macros if there are any further changes (I guess making it a little user friendly depending on who is making the changes). This is particularly useful for customers who have a more dynamic branding which changes frequently depending on the time of the year vs being static after implementation.
Macros in Theme Macro Sets are nothing but variables used in the Theme - Fluid Global Override Style Sheet which are substituted at runtime.
Going back to my example in Part II, we used the following styles in the Theme - Fluid Global Override Style Sheet for changing the Dot Styling on the Fluid Landing Page Footer:
.lpfooter .dot.on {
background: #EEEB4D;
}
.lpfooter .dot {
background: #E8E29E;
border: 2px solid #1d418c;
}
Let us re-write the above styles using custom variables (macros).
NavBar > Navigator > PeopleTools > Portal > Branding > Branding Objects
Edit the custom Fluid - Global Override Style Sheet (CSK_BRAND_FLUID_TEMPLATE) and update the styles as follows:
.lpfooter .dot.on {
%CSK_FOOTER_DOT_ON_CSS;
}
.lpfooter .dot {
%CSK_FOOTER_DOT_CSS;
}

Now, let us add these macros (variables) to our Theme Macro Set:
NavBar > Navigator > PeopleTools > Portal > Branding > Theme Macro Set
Select the custom Theme Macro Set and add the custom variables in the 'Macro List' grid:

Results:

Similarly, we can add other Fluid Style Sheet overrides as custom macro definitions if necessary.
Moving along, the rest of this blog details some advanced branding tasks which can be done in PT 8.55 similar to PT 8.54. I am posting links for those items here for continuity.
Creating an environment specific header for Non-Production databases:
Fluid Housekeeping Steps: Fluid Branding - 8.54 - Part 5B
Task steps: Fluid Branding - 8.54 - Part 5C
We will notice that the above steps would only work for the "Fluid" pages. To make it work on "Classic" pages, we need to perform some additional steps.
Step 1: Update the javascript to modify the jQuery selectors
// Display Database Name using jQuery once the document is ready;
var $jq1 = jQuery.noConflict();
$jq1(document).ready(function(){
// Make sure we are only adding the div once;
if ( $jq1("#cskdbnamecontainer").length === 0 ) {
// Add div to display DB Name;
$jq1( "#PT_HEADER, #ptbr_header_container").prepend( "<div id='cskdbnamecontainer' align='center'><span id='cskdbname'>Test Environment: %dbname</span><a href='#' id='cskdbnamehide'>Hide</a></div>" );
// Add jQuery to hide the DB Name when the 'Hide' link is clicked;
$jq1("#cskdbnamehide").click(function(){
$jq1("#cskdbnamecontainer").hide();
});
}
});

You can see that I added an additional selector (#ptbr_header_container) to the jQuery so that the contained javascript code executes for Classic as well.
Step 2: Inject custom styles into Classic - Theme Style Sheet
NavBar > Navigator > PeopleTools > Portal > Branding > Branding Objects
Append the following styles to CSK_BRAND_CLASSIC_TEMPL_FLUID

Custom styles for reference:
/* Fluid - Display DBName for non-Prod environments */
#cskdbnamecontainer {
height: 26px;
background-color: rgb(204,204,204);
}
#cskdbname {
color: rgba(229,47,0,1);
line-height: 26px;
font-weight: bold;
padding-right: 10px;
}
Step 3: Inject the custom javascript into Classic using Branding System Options
NavBar > Navigator > PeopleTools > Portal > Branding > Branding System Options

Results:


Adding Custom Links to Actions List Menu:
Fluid Branding - 8.54 - Part 5C
Again, we will notice that the above steps would only work for the "Fluid" pages. In order to add custom links on "Classic" pages, we need to perform some additional steps to update the header definition (CSK_HEADER_FLUID).
NavBar > Navigator > PeopleTools > Portal > Branding > Define Headers and Footers


Note: The reason I am using a Static URL as the means to add the custom URL is because the URL object option does not seem to substitute the URL correctly. It appears to be a bug in 8.55.
Results:

Overriding the Favorite Icon:
Fluid Branding - 8.54 - Part 5C
Again, this will only work for "Fluid" pages.
Here are the steps to create a Favorite Icon for Classic Pages:
Step 1: Update custom javascript - CSK_FL_IR_JS
NavBar > Navigator > PeopleTools > Portal > Branding > Branding Objects
Update CSK_FL_IR_JS javascript object as follows:

Javascript for reference:
// Get Image URL for CSK_LOGO (FavIcon);
document.write(unescape("%3Cscript src='/psc/" + site + "/EMPLOYEE/EMPL/s/WEBLIB_FL_CSK.ISCRIPT1.FieldFormula.IScript_Set_Image_URL_Variable?var=cskFavIcon&img=CSK_LOGO_FAVICON' type='text/javascript'%3E%3C/script%3E"));
var $jq = jQuery.noConflict();
$jq(document).ready(function(){
// If Classic;
if ( $jq("#ptbr_header_container").length > 0) {
// create div for favIcon
var favIcon = document.createElement("LINK");
// set attributes and innerHTML
favIcon.setAttribute("rel","shortcut icon");
favIcon.setAttribute("href", cskFavIcon);
// insert favIcon div in the head element
document.getElementsByTagName('head')[0].appendChild(favIcon);
} else {
// Replace Browser Favorite Icon(s);
$jq('head link[href*=LOGO_FAVICON]').attr('href', cskFavIcon);
}
});
Results:


Overriding the "Processing" Icon:
PT_PROCESSING_FMODE:
Fluid Branding - 8.54 - Part 5D


