This post (Part 4B) is a continuation of one of my previous Branding articles on customizing the DEFAULT_THEME_TANGERINE_ALT theme (Part 4A).
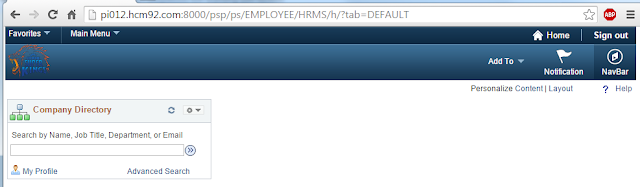
In part 4A, we saw how we could override the logo image while using the DEFAULT_THEME_TANGERINE_ALT theme.
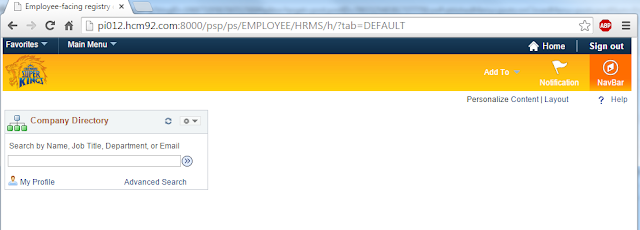
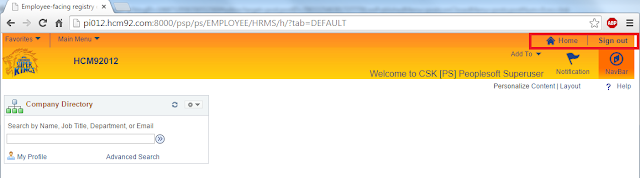
Result:
In this post we will see how we can further customize this theme which was cloned from DEFAULT_THEME_TANGERINE_ALT.
Override Branding Header Background Image:
The background image on the Branding Header is generated by the following style.
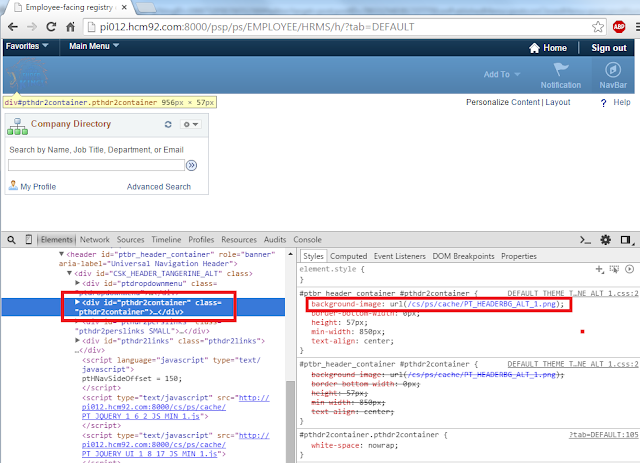
Let us override this style to use a custom image.
Custom Image: CSK_HEADERBG_ALT


Custom Style:
/* Branding Header Background Color */
#ptbr_header_container #pthdr2container.pthdr2container {
background-image: url(%image(CSK_HEADERBG_ALT));
}
The additional custom selector (highlighted above) was added to provide a higher precedence to the custom style.

Test Changes:
Recommendations if you are experiencing caching issues.
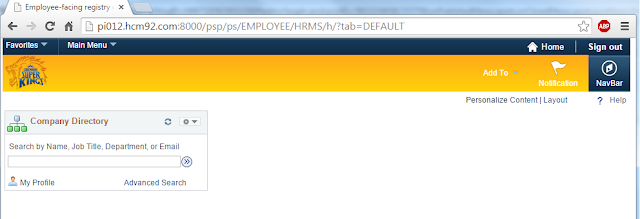
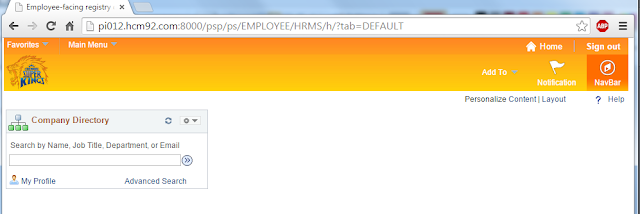
We can see that the branding header background color change has taken effect.
Overriding the NavBar Background Image:
The NavBar background image is generated by the following style.
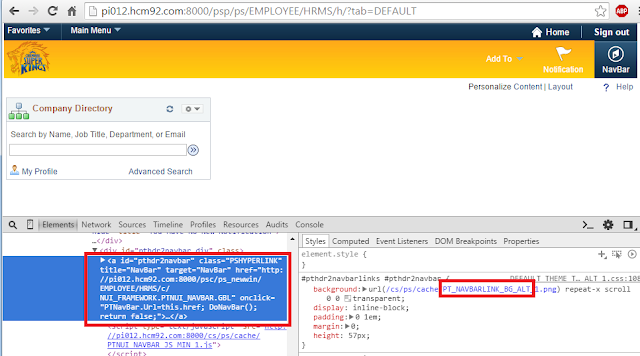
Custom Image: CSK_NAVBARLINK_BG_ALT

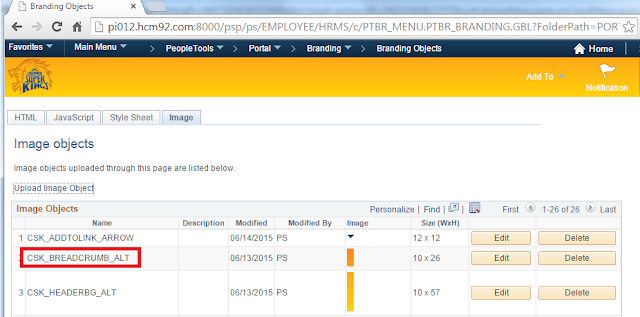
Main Menu > PeopleTools > Portal > Branding > Branding Objects (Image Tab)

Custom Style:
/* NavBar Background Color */
#pthdr2navbarlinks.pthdr2navbarlinks #pthdr2navbar_div #pthdr2navbar {
background: url(%image(CSK_NAVBARLINK_BG_ALT)) repeat-x scroll 0 0 transparent;
}
The additional custom selector (highlighted above) was added to provide a higher precedence to the custom style.

Test Changes:
Recommendations if you are experiencing caching issues.
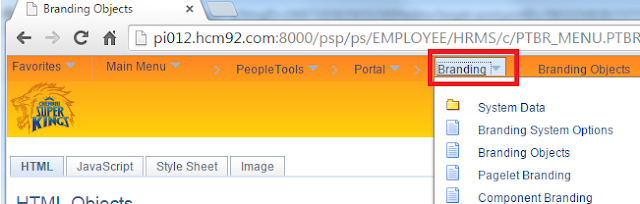
Overriding the Drop Down Menu Background Image:
The drop down menu background image is generated by the following style.
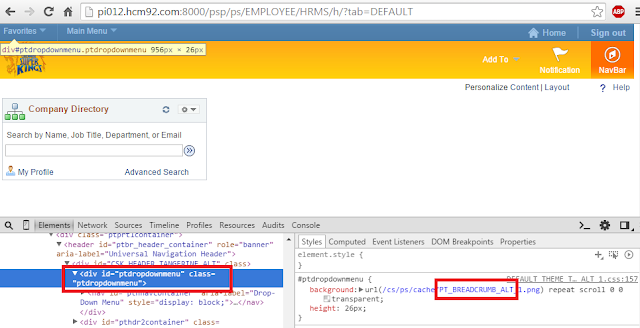
Custome Image: CSK_BREADCRUMB_ALT

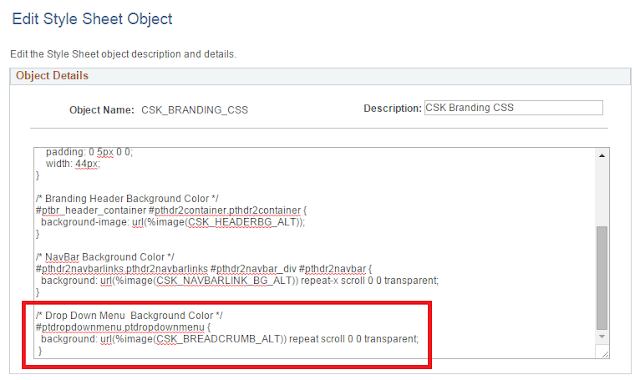
Custom Style:
/* Drop Down Menu Background Color */
#ptdropdownmenu.ptdropdownmenu {
background: url(%image(CSK_BREADCRUMB_ALT)) repeat scroll 0 0 transparent;
}
The additional custom selector (highlighted above) was added to provide a higher precedence to the custom style.
Test Changes:
Recommendations if you are experiencing caching issues.
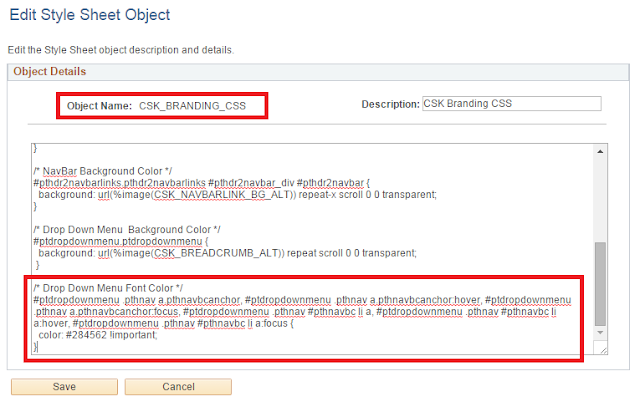
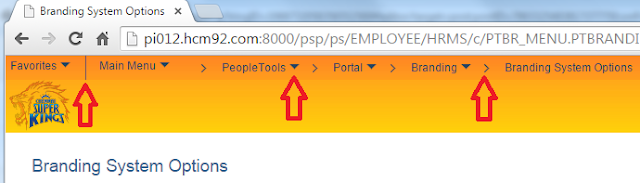
Override Drop Down Menu Font Color:
The drop down menu font color is generated by the following style.

Custom Style:
/* Drop Down Menu Font Color */
#ptdropdownmenu .pthnav a.pthnavbcanchor, #ptdropdownmenu .pthnav a.pthnavbcanchor:hover, #ptdropdownmenu .pthnav a.pthnavbcanchor:focus, #ptdropdownmenu .pthnav #pthnavbc li a, #ptdropdownmenu .pthnav #pthnavbc li a:hover, #ptdropdownmenu .pthnav #pthnavbc li a:focus {
color: #284562 !important;
}
The additional custom selector (highlighted above) was added to provide a higher precedence to the custom style.
Test Changes:
Recommendations if you are experiencing caching issues.

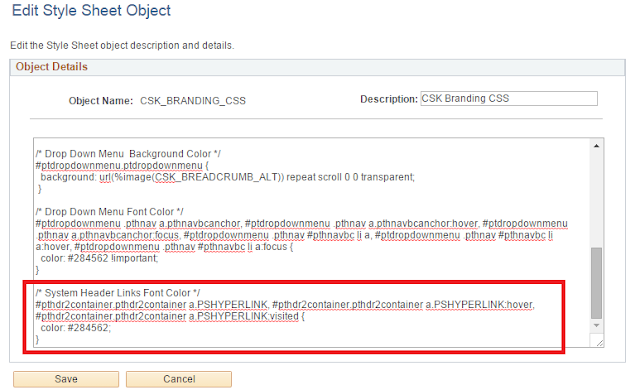
Override System Links Font Color:
The system links font color is generated by the following style.
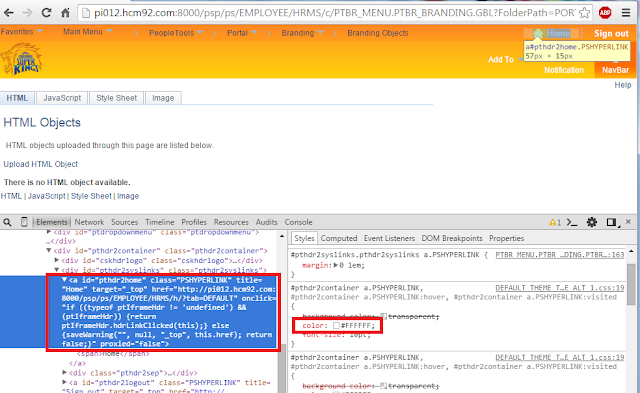
Custom Style:
/* System Header Links Font Color */
#pthdr2container.pthdr2container a.PSHYPERLINK, #pthdr2container.pthdr2container a.PSHYPERLINK:hover, #pthdr2container.pthdr2container a.PSHYPERLINK:visited {
color: #284562;
}
The additional custom selector (highlighted above) was added to provide a higher precedence to the custom style.
Test Changes:
Recommendations if you are experiencing caching issues.
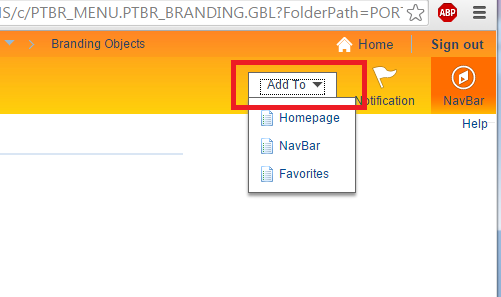
Override Drop Down Menu and 'Add To' Menu - Active Background Color:

Custom Styles:
/* Add To Drop Down Background Color (Active) */
#pthdr2navbarlinks.pthdr2navbarlinks #pthdr2addto_div.active {
background-color: #FFFFFF;
border: 1px solid #666666;
}
/* Drop Down Menu Navigation Background Color (Active) */
.pthnav .pthnavbaropen {
background-color: #FFFFFF;
}
The additional custom selector (highlighted above) was added to provide a higher precedence to the custom styles.

Test Changes:
Recommendations if you are experiencing caching issues.

Override Drop Down Menu Icon Images:

Custom Images:
CSK_HNAV_ALT_FAV_SEP

CSK_HNAV_ALT_BC_DOWN_ARROW

CSK_HNAV_ALT_HIERARCHY_SEP

Custom Styles:
/* Drop Down Menu Down Arrow Image */
#ptdropdownmenu.ptdropdownmenu .pthnavbarfldr:after {
content: url(%image(CSK_HNAV_ALT_BC_DOWN_ARROW));
}
/* Drop Down Menu Fav Icon Separator Image */
#ptdropdownmenu.ptdropdownmenu li#pthnavfavsep {
background-image: url(%image(CSK_HNAV_ALT_FAV_SEP));
}
/* Drop Down Menu Hierarchy Separator Image */
#ptdropdownmenu.ptdropdownmenu li.pthnavhiearchysep:before {
content: url(%image(CSK_HNAV_ALT_HIEARCHY_SEP));
}
The additional custom selector (highlighted above) was added to provide a higher precedence to the custom styles.

Test Changes:
Recommendations if you are experiencing caching issues.
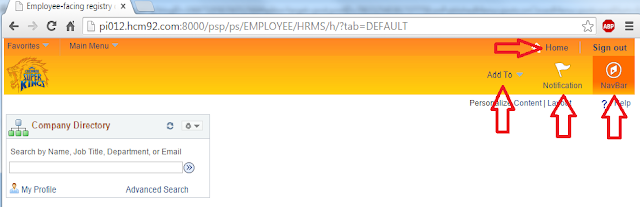
Override System Link Icons and NavBar Icon Images:

Custom System Link Icon Images:
CSK_HEADERLINK_HOME_ALT:

CSK_HEADERLINK_SEP_ALT:


Custom NavBar Icon Images:
CSK_ADDTOLINK_ARROW:

CSK_HEADER_ALERTS (SVG image):
CSK_HEADER_NAVBAR (SVG image):
Custom Styles:
/* Home Icon Image */
#pthdr2container.pthdr2container #pthdr2home {
background: url(%image(CSK_HEADERLINK_HOME_ALT)) no-repeat scroll left center transparent;
}
/* System Header Links Separator */
#pthdr2container.pthdr2container .pthdr2sep {
background: url(%image(CSK_HEADERLINK_SEP_ALT)) no-repeat scroll center center transparent;
}
/* Add To Drop Down List Down Arrow Image */
#pthdr2navbarlinks.pthdr2navbarlinks #pthdr2addto:after {
content: url(%image(CSK_ADDTOLINK_ARROW));
}
/* Notification Icon Image */
#pthdr2navbarlinks #pthdr2notify_div #pthdr2notify span {
background: url(%image(CSK_HEADER_ALERTS)) no-repeat scroll center 8px transparent;
}
/* NavBar Icon Image */
#pthdr2navbarlinks #pthdr2navbar_div #pthdr2navbar span {
background: url(%image(CSK_HEADER_NAVBAR)) no-repeat scroll center 8px transparent;
}
The additional custom selector (highlighted above) was added to provide a higher precedence to the custom styles.

Test Changes:
Recommendations if you are experiencing caching issues.

Add a Hyperlink to the Branding Logo:
In this section we will see how we can add a hyperlink to the branding logo. This would be useful in cases where we might want to link the logo to another website.
Create Custom URL:

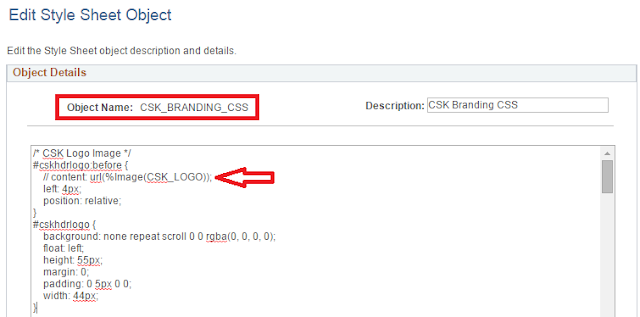
Modify existing style for the Branding Logo:
Comment the content property.
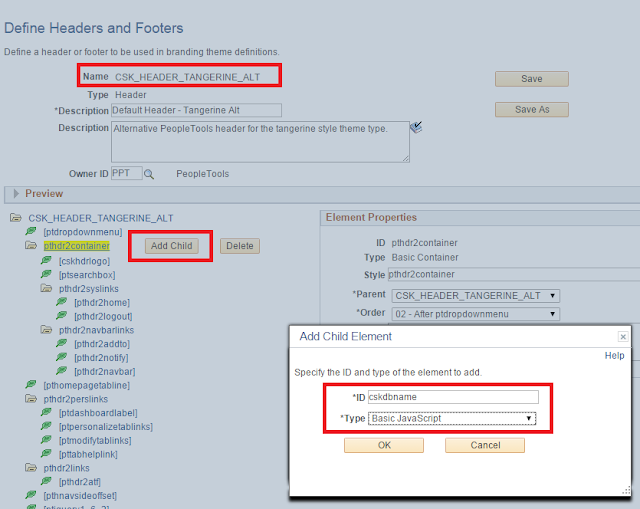
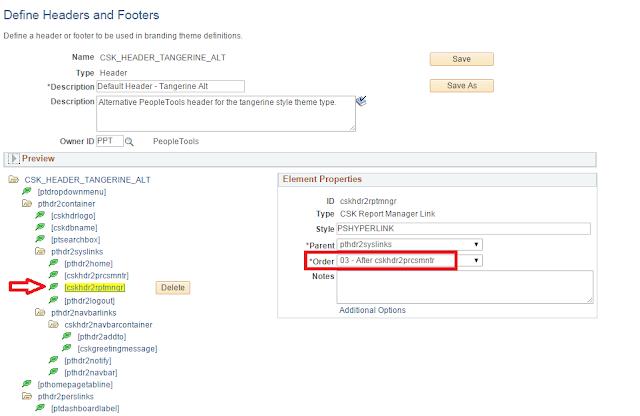
Modify the logo element in the custom Header Definition:
PeopleTools > Portal > Branding > Define Headers and Footers

We replaced the existing Static HTML (which was a non-breaking space - ) with an anchor element referencing the URL Definition (href), Image Object (img element) and URL Definition Description (title).
HTML for reference:
<a href='%URL(CSK_LOGO_URL)'>
<img src='%image(CSK_LOGO)' title='%URL(CSK_LOGO_URL, DESCR)' style='border: none;'></img>
</a>
Test Changes:
Recommendations if you are experiencing caching issues.

Display Database Name on the Branding Header:
Most organizations would like to print the name of the database on the branding header for test environments (e.g.: DEV, TST, UAT, etc). Let us see how we can display the database name on the branding header.
Additionally, we will use a custom javascript object to write some conditional logic to only display the database name if it is a non-production environment. This helps us to keep the header "clean" for production but display the database name only for testing (non-production) environments.
Create Custom Javascript Object:
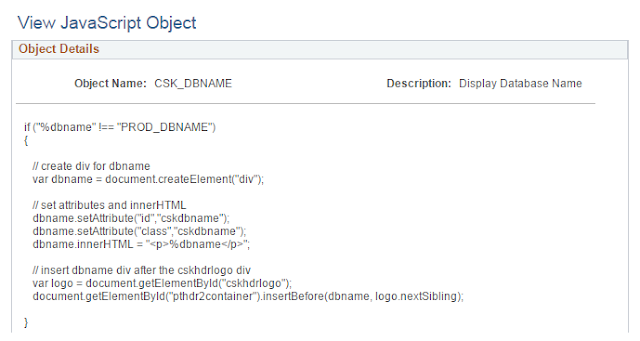
if ("%dbname" !== "PROD_DBNAME")
{
// create div for dbname
var dbname = document.createElement("div");
// set attributes and innerHTML
dbname.setAttribute("id","cskdbname");
dbname.setAttribute("class","cskdbname");
dbname.innerHTML = "<p>%dbname</p>";
// insert dbname div after the cskhdrlogo div
var logo = document.getElementById("cskhdrlogo");
document.getElementById("pthdr2container").insertBefore(dbname, logo.nextSibling);
}
Note: In the javascript, replace PROD_DBNAME with the actual name of your Production Database.
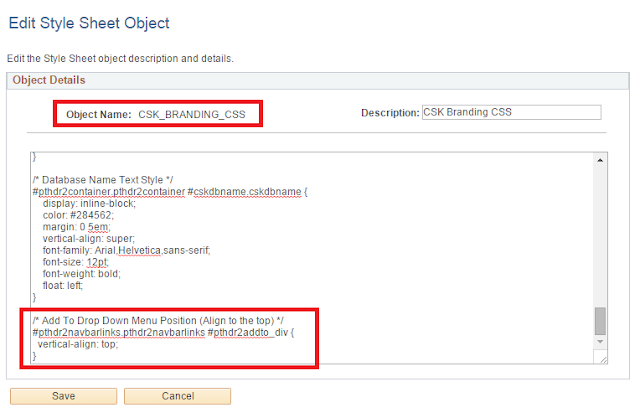
Create Custom Style for Database Name:
/* Database Name Text Style */
#pthdr2container.pthdr2container #cskdbname.cskdbname {
display: inline-block;
color: #284562;
margin: 0 5em;
vertical-align: super;
font-family: Arial,Helvetica,sans-serif;
font-size: 12pt;
font-weight: bold;
float: left;
}

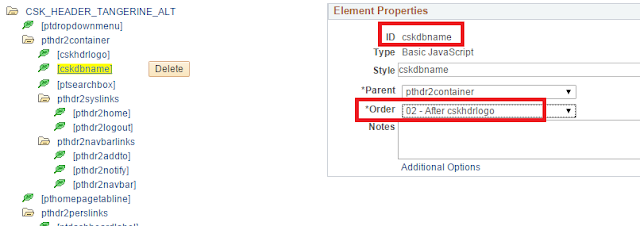
Add a new leaf element to represent the database name on the Branding Header Definition:
We will add a new child element under the pthdr2container. This element is a basic javascript type (cskdbname) which is ordered after the cskhdrlogo element.

Test Changes:
Recommendations if you are experiencing caching issues.

Display Dynamic and User Specific Greeting Message:
In this section, let us see how we can modify the Branding Header definition to display a dynamic greeting message for the users.
The personalized greeting message would display the text "Welcome to CSK " appended with the User's Description text using the %UserDescription system variable.
Let us assume we want to display this greeting message at the bottom of the 'Add To' menu.
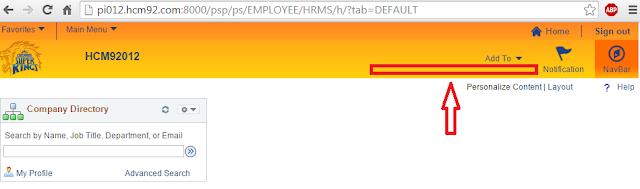
Before we add the message, let us make a little bit of room by moving the 'Add To' menu to the top.
Move elements using CSS:
Custom Style:
/* Add To Drop Down Menu Position (Align to the top) */
#pthdr2navbarlinks.pthdr2navbarlinks #pthdr2addto_div {
vertical-align: top;
}
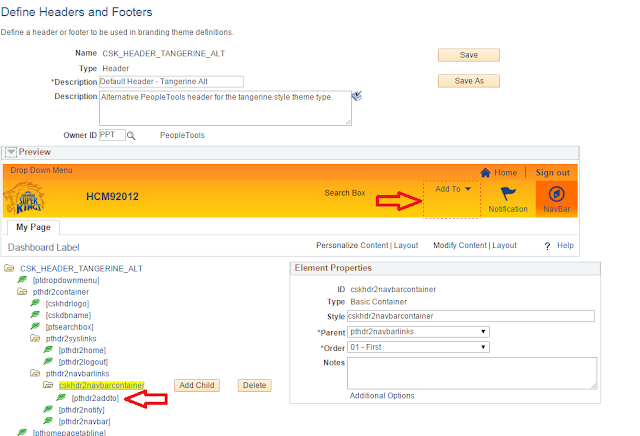
Result:
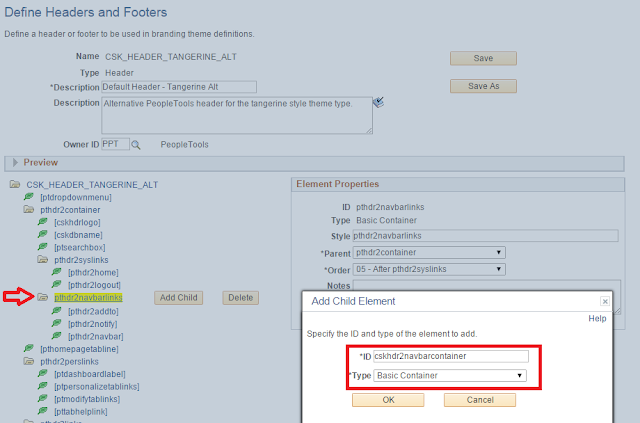
Add a Child Element under pthdr2navbarlinks:
This will serve as a container for holding both the 'Add To' menu and the new custom greeting message.
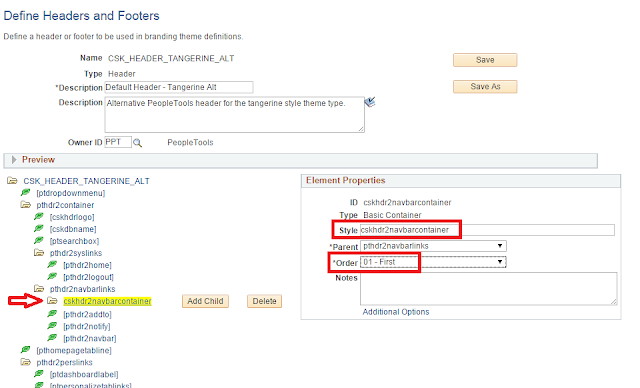
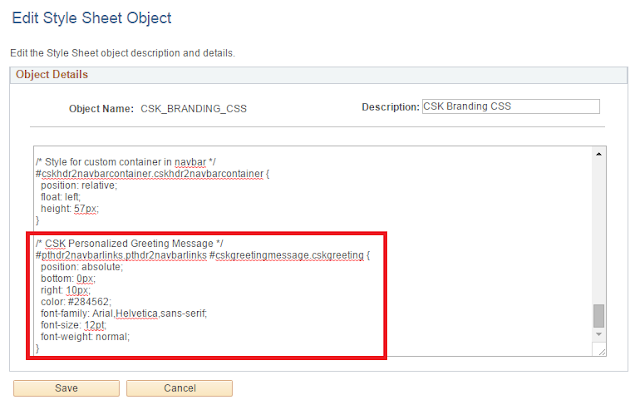
Custom Style for cskhdr2navbarcontainer:
/* Style for custom container in navbar */
#cskhdr2navbarcontainer.cskhdr2navbarcontainer {
position: relative;
float: left;
height: 57px;
}

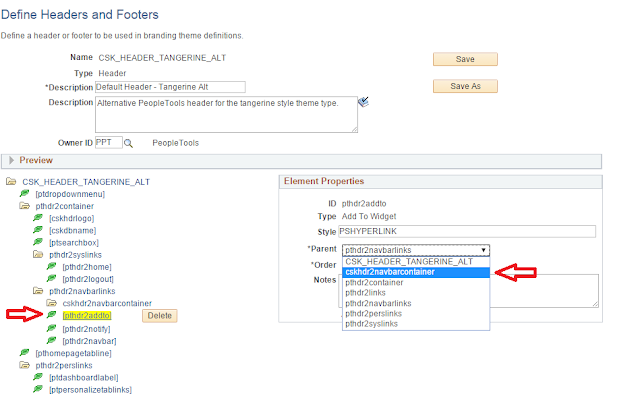
Move 'Add To' Drop Down Menu under cskhdr2navbarcontainer:
Let us set the parent for 'pthdr2addto' element as 'cskhdr2navbarcontainer'.
Result:
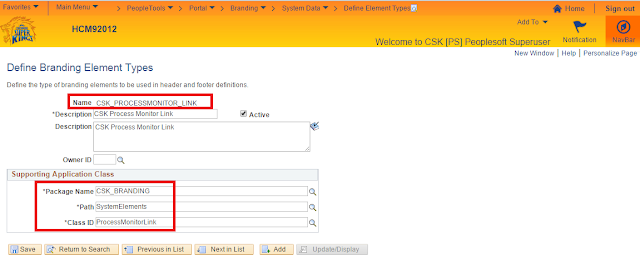
Create Custom Branding Element Type for Greeting Message:
Main Menu > PeopleTools > Portal > Branding > System Data > Define Element Types

Note: The implementation details for the Custom App Class CSKGreetingText is exactly the same as in my previous post - PeopleTools 8.54 - Branding - Part 3 (Please refer Display Dynamic and User Specific Greeting Message using Custom Branding Elements section).
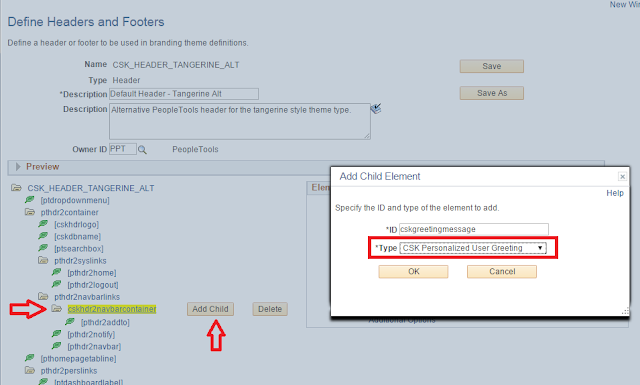
Add custom 'Greeting Message' element to the Branding Header:
Add 'cskgreetingmessage' element under 'cskhdr2navbarcontainer' using 'CSK Personalized User Greeting' as the element type.
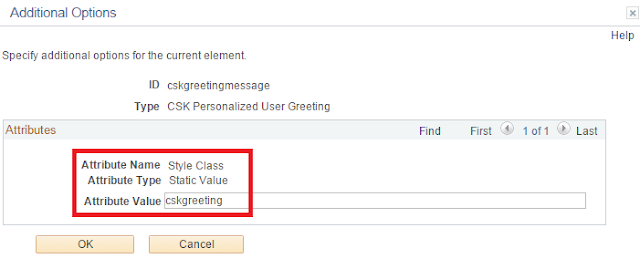

Add custom style for the Greeting Message:
/* CSK Personalized Greeting Message */
#pthdr2navbarlinks.pthdr2navbarlinks #cskgreetingmessage.cskgreeting {
position: absolute;
bottom: 0px;
right: 10px;
color: #284562;
font-family: Arial,Helvetica,sans-serif;
font-size: 12pt;
font-weight: normal;
}
Test Changes:
Recommendations if you are experiencing caching issues.

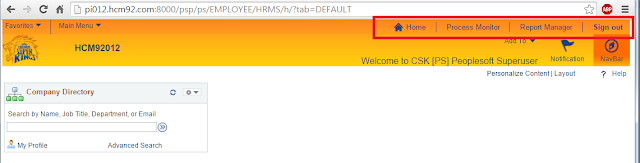
Add Custom Links to the Branding Header System Links:
In this section let us see how we can add some useful links (for pages of interest such as Process Monitor and Report Manager) to the System Links section on the Branding Header.
Create Custom Element Types for Process Monitor and Report Manager Links:
Main Menu > PeopleTools > Portal > Branding > System Data > Define Element Types
Process Monitor:
Report Manager:
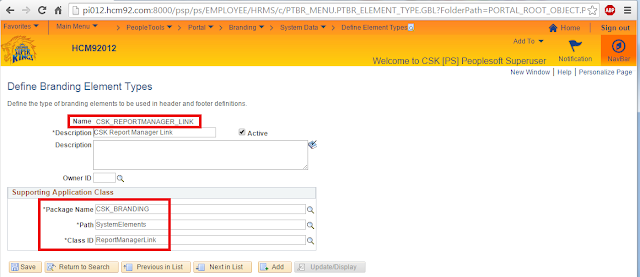
Note: The implementation details for the Custom App Classes ProcessMonitorLink and ReportManagerLink are exactly the same as in my previous post - PeopleTools 8.54 - Branding - Part 3 (Please refer Application Class Implementation for Process Monitor AND Application Class Implementation for Report Manager sections).
Add Process Monitor and Report Monitor Elements to Branding Header:


Test Changes:
Recommendations if you are experiencing caching issues.
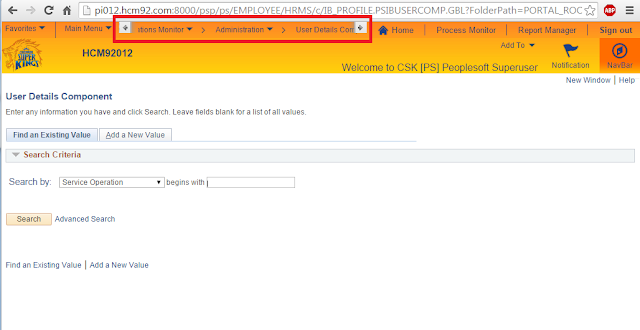
Adjusting the width of the Navigation Breadcrumb Scroll to accommodate the additional links on the Branding Header System Links:
Special thanks to Cache Staheli (see comments below) who pointed out an issue with adding custom links to the System Links. It appears that when we add custom links to System Links, the Navigation Breadcrumb Scroll (which can be seen when the browser width is reduced/limited) overlays with the System Links causing the entire header to render poorly.

Upon inspecting the HTML further, we will find that there is a hard-coded offset (set to 150) injected as part of a javascript.

Let us see how we can override this hard-coding to accommodate our additional custom links. This offset value is set in a javascript that is associated as part of the header definition. Note: This javascript would not be available as a PeopleTools managed object as it is added directly as a static javascript (meaning it cannot be found in App Designer).

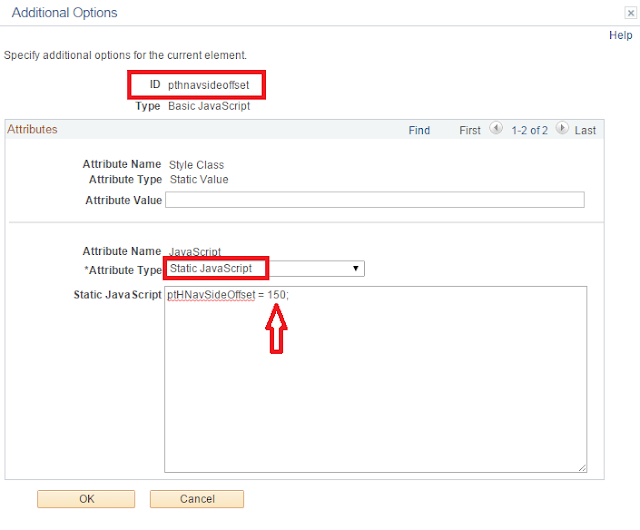
Let us go ahead and update this offset value to something that is more appropriate to the current header design.

If you would like to make the offset variable a bit more dynamic then you can use the following JavaScript to replace the Static JavaScript:
// ptHNavSideOffset = 150;
ptHNavSideOffset = document.getElementById("pthdr2syslinks").clientWidth;
This would ensure that the offset is set to the width of the pthdr2syslinks (the container DIV for the Branding Header - System Links).
Test Changes:
Additional Customizations:
Please refer PeopleTools 8.54 - Branding - Part 3 for the following changes (implementation steps are exactly the same):
- Branding the Timeout Popup Warning Message
- Implementing Google Analytics
- Migrating Branding to other environments
Note: For 'Migrating Branding Objects to other environments' please also refer the following links:
Branding Objects - Migration Issue and Workaround
E-PORTAL: Managed Branding Objects are not Accessible in the Target Environment After Migration (Doc ID 2011383.1)
Adding/Updating the FavIcon for Classic (Included on 2016/04/01):
Refer: FavIcon for Classic
In part 4A, we saw how we could override the logo image while using the DEFAULT_THEME_TANGERINE_ALT theme.
Result:

In this post we will see how we can further customize this theme which was cloned from DEFAULT_THEME_TANGERINE_ALT.
Override Branding Header Background Image:
The background image on the Branding Header is generated by the following style.

Let us override this style to use a custom image.
Custom Image: CSK_HEADERBG_ALT


Custom Style:
/* Branding Header Background Color */
#ptbr_header_container #pthdr2container.pthdr2container {
background-image: url(%image(CSK_HEADERBG_ALT));
}
The additional custom selector (highlighted above) was added to provide a higher precedence to the custom style.

Test Changes:
Recommendations if you are experiencing caching issues.
- Clear local browser cache.
- Shutdown, purge and reboot the web server(s).

We can see that the branding header background color change has taken effect.
Overriding the NavBar Background Image:
The NavBar background image is generated by the following style.

Custom Image: CSK_NAVBARLINK_BG_ALT

Main Menu > PeopleTools > Portal > Branding > Branding Objects (Image Tab)
Custom Style:
/* NavBar Background Color */
#pthdr2navbarlinks.pthdr2navbarlinks #pthdr2navbar_div #pthdr2navbar {
background: url(%image(CSK_NAVBARLINK_BG_ALT)) repeat-x scroll 0 0 transparent;
}
The additional custom selector (highlighted above) was added to provide a higher precedence to the custom style.

Test Changes:
Recommendations if you are experiencing caching issues.
- Clear local browser cache.
- Shutdown, purge and reboot the web server(s).

Overriding the Drop Down Menu Background Image:
The drop down menu background image is generated by the following style.

Custome Image: CSK_BREADCRUMB_ALT


Custom Style:
/* Drop Down Menu Background Color */
#ptdropdownmenu.ptdropdownmenu {
background: url(%image(CSK_BREADCRUMB_ALT)) repeat scroll 0 0 transparent;
}
The additional custom selector (highlighted above) was added to provide a higher precedence to the custom style.

Test Changes:
Recommendations if you are experiencing caching issues.
- Clear local browser cache.
- Shutdown, purge and reboot the web server(s).

Override Drop Down Menu Font Color:
The drop down menu font color is generated by the following style.

Custom Style:
/* Drop Down Menu Font Color */
#ptdropdownmenu .pthnav a.pthnavbcanchor, #ptdropdownmenu .pthnav a.pthnavbcanchor:hover, #ptdropdownmenu .pthnav a.pthnavbcanchor:focus, #ptdropdownmenu .pthnav #pthnavbc li a, #ptdropdownmenu .pthnav #pthnavbc li a:hover, #ptdropdownmenu .pthnav #pthnavbc li a:focus {
color: #284562 !important;
}
The additional custom selector (highlighted above) was added to provide a higher precedence to the custom style.

Test Changes:
Recommendations if you are experiencing caching issues.
- Clear local browser cache.
- Shutdown, purge and reboot the web server(s).

Override System Links Font Color:
The system links font color is generated by the following style.

Custom Style:
/* System Header Links Font Color */
#pthdr2container.pthdr2container a.PSHYPERLINK, #pthdr2container.pthdr2container a.PSHYPERLINK:hover, #pthdr2container.pthdr2container a.PSHYPERLINK:visited {
color: #284562;
}
The additional custom selector (highlighted above) was added to provide a higher precedence to the custom style.

Test Changes:
Recommendations if you are experiencing caching issues.
- Clear local browser cache.
- Shutdown, purge and reboot the web server(s).

Override Drop Down Menu and 'Add To' Menu - Active Background Color:


Custom Styles:
/* Add To Drop Down Background Color (Active) */
#pthdr2navbarlinks.pthdr2navbarlinks #pthdr2addto_div.active {
background-color: #FFFFFF;
border: 1px solid #666666;
}
/* Drop Down Menu Navigation Background Color (Active) */
.pthnav .pthnavbaropen {
background-color: #FFFFFF;
}
The additional custom selector (highlighted above) was added to provide a higher precedence to the custom styles.

Test Changes:
Recommendations if you are experiencing caching issues.
- Clear local browser cache.
- Shutdown, purge and reboot the web server(s).


Override Drop Down Menu Icon Images:

Custom Images:
CSK_HNAV_ALT_FAV_SEP

CSK_HNAV_ALT_BC_DOWN_ARROW
CSK_HNAV_ALT_HIERARCHY_SEP

Custom Styles:
/* Drop Down Menu Down Arrow Image */
#ptdropdownmenu.ptdropdownmenu .pthnavbarfldr:after {
content: url(%image(CSK_HNAV_ALT_BC_DOWN_ARROW));
}
/* Drop Down Menu Fav Icon Separator Image */
#ptdropdownmenu.ptdropdownmenu li#pthnavfavsep {
background-image: url(%image(CSK_HNAV_ALT_FAV_SEP));
}
/* Drop Down Menu Hierarchy Separator Image */
#ptdropdownmenu.ptdropdownmenu li.pthnavhiearchysep:before {
content: url(%image(CSK_HNAV_ALT_HIEARCHY_SEP));
}
The additional custom selector (highlighted above) was added to provide a higher precedence to the custom styles.

Test Changes:
Recommendations if you are experiencing caching issues.
- Clear local browser cache.
- Shutdown, purge and reboot the web server(s).

Override System Link Icons and NavBar Icon Images:

Custom System Link Icon Images:
CSK_HEADERLINK_HOME_ALT:

CSK_HEADERLINK_SEP_ALT:


Custom NavBar Icon Images:
CSK_ADDTOLINK_ARROW:
CSK_HEADER_ALERTS (SVG image):

CSK_HEADER_NAVBAR (SVG image):

Custom Styles:
/* Home Icon Image */
#pthdr2container.pthdr2container #pthdr2home {
background: url(%image(CSK_HEADERLINK_HOME_ALT)) no-repeat scroll left center transparent;
}
/* System Header Links Separator */
#pthdr2container.pthdr2container .pthdr2sep {
background: url(%image(CSK_HEADERLINK_SEP_ALT)) no-repeat scroll center center transparent;
}
/* Add To Drop Down List Down Arrow Image */
#pthdr2navbarlinks.pthdr2navbarlinks #pthdr2addto:after {
content: url(%image(CSK_ADDTOLINK_ARROW));
}
/* Notification Icon Image */
#pthdr2navbarlinks #pthdr2notify_div #pthdr2notify span {
background: url(%image(CSK_HEADER_ALERTS)) no-repeat scroll center 8px transparent;
}
/* NavBar Icon Image */
#pthdr2navbarlinks #pthdr2navbar_div #pthdr2navbar span {
background: url(%image(CSK_HEADER_NAVBAR)) no-repeat scroll center 8px transparent;
}
The additional custom selector (highlighted above) was added to provide a higher precedence to the custom styles.

Test Changes:
Recommendations if you are experiencing caching issues.
- Clear local browser cache.
- Shutdown, purge and reboot the web server(s).

Add a Hyperlink to the Branding Logo:
In this section we will see how we can add a hyperlink to the branding logo. This would be useful in cases where we might want to link the logo to another website.
Create Custom URL:

Modify existing style for the Branding Logo:
Comment the content property.

Modify the logo element in the custom Header Definition:
PeopleTools > Portal > Branding > Define Headers and Footers

We replaced the existing Static HTML (which was a non-breaking space - ) with an anchor element referencing the URL Definition (href), Image Object (img element) and URL Definition Description (title).
HTML for reference:
<a href='%URL(CSK_LOGO_URL)'>
<img src='%image(CSK_LOGO)' title='%URL(CSK_LOGO_URL, DESCR)' style='border: none;'></img>
</a>
Test Changes:
Recommendations if you are experiencing caching issues.
- Clear local browser cache.
- Shutdown, purge and reboot the web server(s).

Display Database Name on the Branding Header:
Most organizations would like to print the name of the database on the branding header for test environments (e.g.: DEV, TST, UAT, etc). Let us see how we can display the database name on the branding header.
Additionally, we will use a custom javascript object to write some conditional logic to only display the database name if it is a non-production environment. This helps us to keep the header "clean" for production but display the database name only for testing (non-production) environments.
Create Custom Javascript Object:

if ("%dbname" !== "PROD_DBNAME")
{
// create div for dbname
var dbname = document.createElement("div");
// set attributes and innerHTML
dbname.setAttribute("id","cskdbname");
dbname.setAttribute("class","cskdbname");
dbname.innerHTML = "<p>%dbname</p>";
// insert dbname div after the cskhdrlogo div
var logo = document.getElementById("cskhdrlogo");
document.getElementById("pthdr2container").insertBefore(dbname, logo.nextSibling);
}
Note: In the javascript, replace PROD_DBNAME with the actual name of your Production Database.
Create Custom Style for Database Name:
/* Database Name Text Style */
#pthdr2container.pthdr2container #cskdbname.cskdbname {
display: inline-block;
color: #284562;
margin: 0 5em;
vertical-align: super;
font-family: Arial,Helvetica,sans-serif;
font-size: 12pt;
font-weight: bold;
float: left;
}

Add a new leaf element to represent the database name on the Branding Header Definition:
We will add a new child element under the pthdr2container. This element is a basic javascript type (cskdbname) which is ordered after the cskhdrlogo element.


Test Changes:
Recommendations if you are experiencing caching issues.
- Clear local browser cache.
- Shutdown, purge and reboot the web server(s).

Display Dynamic and User Specific Greeting Message:
In this section, let us see how we can modify the Branding Header definition to display a dynamic greeting message for the users.
The personalized greeting message would display the text "Welcome to CSK " appended with the User's Description text using the %UserDescription system variable.
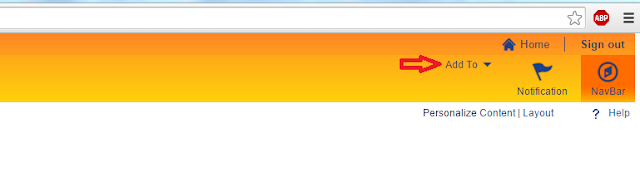
Let us assume we want to display this greeting message at the bottom of the 'Add To' menu.

Before we add the message, let us make a little bit of room by moving the 'Add To' menu to the top.
Move elements using CSS:
Custom Style:
/* Add To Drop Down Menu Position (Align to the top) */
#pthdr2navbarlinks.pthdr2navbarlinks #pthdr2addto_div {
vertical-align: top;
}

Result:

Add a Child Element under pthdr2navbarlinks:
This will serve as a container for holding both the 'Add To' menu and the new custom greeting message.


Custom Style for cskhdr2navbarcontainer:
/* Style for custom container in navbar */
#cskhdr2navbarcontainer.cskhdr2navbarcontainer {
position: relative;
float: left;
height: 57px;
}

Move 'Add To' Drop Down Menu under cskhdr2navbarcontainer:
Let us set the parent for 'pthdr2addto' element as 'cskhdr2navbarcontainer'.

Result:

Create Custom Branding Element Type for Greeting Message:
Main Menu > PeopleTools > Portal > Branding > System Data > Define Element Types

Note: The implementation details for the Custom App Class CSKGreetingText is exactly the same as in my previous post - PeopleTools 8.54 - Branding - Part 3 (Please refer Display Dynamic and User Specific Greeting Message using Custom Branding Elements section).
Add custom 'Greeting Message' element to the Branding Header:
Add 'cskgreetingmessage' element under 'cskhdr2navbarcontainer' using 'CSK Personalized User Greeting' as the element type.


Add custom style for the Greeting Message:
/* CSK Personalized Greeting Message */
#pthdr2navbarlinks.pthdr2navbarlinks #cskgreetingmessage.cskgreeting {
position: absolute;
bottom: 0px;
right: 10px;
color: #284562;
font-family: Arial,Helvetica,sans-serif;
font-size: 12pt;
font-weight: normal;
}

Test Changes:
Recommendations if you are experiencing caching issues.
- Clear local browser cache.
- Shutdown, purge and reboot the web server(s).

Add Custom Links to the Branding Header System Links:
In this section let us see how we can add some useful links (for pages of interest such as Process Monitor and Report Manager) to the System Links section on the Branding Header.

Create Custom Element Types for Process Monitor and Report Manager Links:
Main Menu > PeopleTools > Portal > Branding > System Data > Define Element Types
Process Monitor:

Report Manager:

Note: The implementation details for the Custom App Classes ProcessMonitorLink and ReportManagerLink are exactly the same as in my previous post - PeopleTools 8.54 - Branding - Part 3 (Please refer Application Class Implementation for Process Monitor AND Application Class Implementation for Report Manager sections).
Add Process Monitor and Report Monitor Elements to Branding Header:


Test Changes:
Recommendations if you are experiencing caching issues.
- Clear local browser cache.
- Shutdown, purge and reboot the web server(s).

Adjusting the width of the Navigation Breadcrumb Scroll to accommodate the additional links on the Branding Header System Links:
Special thanks to Cache Staheli (see comments below) who pointed out an issue with adding custom links to the System Links. It appears that when we add custom links to System Links, the Navigation Breadcrumb Scroll (which can be seen when the browser width is reduced/limited) overlays with the System Links causing the entire header to render poorly.

Upon inspecting the HTML further, we will find that there is a hard-coded offset (set to 150) injected as part of a javascript.

Let us see how we can override this hard-coding to accommodate our additional custom links. This offset value is set in a javascript that is associated as part of the header definition. Note: This javascript would not be available as a PeopleTools managed object as it is added directly as a static javascript (meaning it cannot be found in App Designer).


Let us go ahead and update this offset value to something that is more appropriate to the current header design.

If you would like to make the offset variable a bit more dynamic then you can use the following JavaScript to replace the Static JavaScript:
// ptHNavSideOffset = 150;
ptHNavSideOffset = document.getElementById("pthdr2syslinks").clientWidth;
This would ensure that the offset is set to the width of the pthdr2syslinks (the container DIV for the Branding Header - System Links).
Test Changes:

Additional Customizations:
Please refer PeopleTools 8.54 - Branding - Part 3 for the following changes (implementation steps are exactly the same):
- Branding the Timeout Popup Warning Message
- Implementing Google Analytics
- Migrating Branding to other environments
Note: For 'Migrating Branding Objects to other environments' please also refer the following links:
Branding Objects - Migration Issue and Workaround
E-PORTAL: Managed Branding Objects are not Accessible in the Target Environment After Migration (Doc ID 2011383.1)
Adding/Updating the FavIcon for Classic (Included on 2016/04/01):
Refer: FavIcon for Classic