This post is a continuation of my previous articles on Branding PeopleTools 8.54 applications.
Part 1 detailed the basics of what's new with Branding in PeopleTools 8.54 and provided steps to change the logo of the application. Part 2 detailed steps to achieve several common branding requirements such as changing the background color of the branding header, changing the background color and the font color of the Navigation Drop-Down Menu, changing the font color of the Branding System Links, adding a hyperlink to the Branding Logo, moving branding elements (div) using css and adding database name to the Branding Header. We were able to perform all these tasks simply by using the online configuration pages for Branding provided as part of PeopleTools 8.54.
In this post we will dive into some of the more advanced Branding requirements that may potentially require the use of Application Designer.

What is this popup and where is it coming from? This popup message is the PeopleSoft delivered Timeout Warning Message that is displayed to warn the user of an impending timeout of their session (due to inactivity).
If we examine the URL of this Popup message we can see that it is generated by an IScript.
http://pt854.hcm92.com:8000/psc/ps/EMPLOYEE/HRMS/s/WEBLIB_TIMEOUT.PT_TIMEOUTWARNING.FieldFormula.IScript_TIMEOUTWARNING
This IScript is configured on the web profile which is currently being used by the web server.
PeopleTools > Web Profile > Web Profile Configuration (Security Tab)
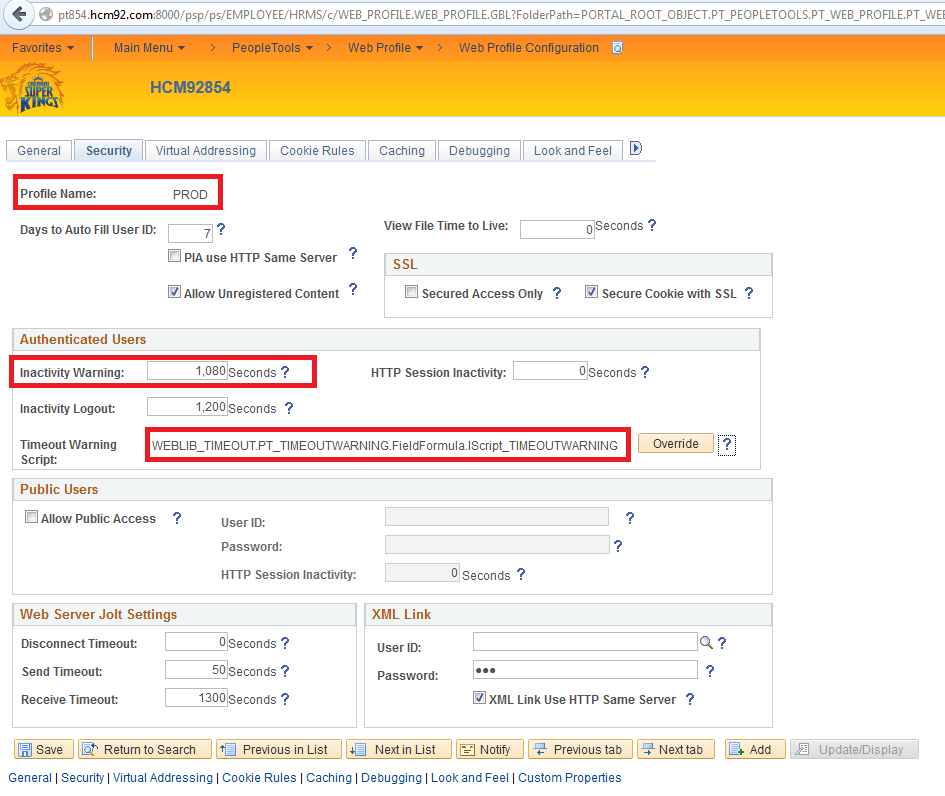
In the screenshot above, we can see the configuration that triggers this popup message. A handy tip while testing changes to the timeout warning is to change the "Inactivity Warning" seconds to a shorter period like 120 or 180 seconds. This helps in triggering the popup without having to wait for extended periods of time (Note: Any changes to the web profile requires a reboot of the web server to take effect).
As this popup is generated through an IScript, I don't see a way we can override the Oracle Logo on the popup by overriding the stylesheet or by using other Branding Configuration.
There are two ways we can go about this customization:
1. Create a custom IScript that is a clone of the delivered IScript and then perform all customizations in the custom IScript. This option requires us to update the Web Profile to Override the Timout Warning Script to reference our custom IScript.
2. Simply customize the delivered IScript.
For the purposes of this post, I would be customizing the delivered IScript (second option) because I just want to replace the Oracle Logo with my custom logo.
- Update Timeout Warning IScript:
Open IScript Record PeopleCode using App Designer.

Change the reference to the Oracle Logo (Image.NEW_PS_LOGO) to use Custom Logo.
Customized Timout Warning IScript Code:
Declare Function SetDocDomainForPortal PeopleCode FUNCLIB_PORTAL.TEMPLATE_FUNC FieldFormula;
Declare Function PTGetStyleSheetURL PeopleCode FUNCLIB_PORTAL.PORTAL_GEN_FUNC FieldFormula;
Function IScript_TIMEOUTWARNING()
&howLong = %Request.Timeout * 1000 - %Request.WarningTimeout * 1000 - 2000;
&timeoutWarningMsg = MsgGetText(146, 91, "Your session is about to be timed out. As a security precaution, sessions end after ");
&timeoutWarningMsg = &timeoutWarningMsg | " " | Integer(%Request.Timeout / 60) | " " | MsgGetText(146, 92, "minutes of inactivity. Click OK to continue your current session.");
&domainScript = SetDocDomainForPortal();
/* CSK - Timeout Warning Logo Customization - Start */
rem commenting delivered code &HTML = GetHTMLText(HTML.PT_TIMEOUTWARNING, PTGetStyleSheetURL(), %Response.GetJavaScriptURL(HTML.PT_SAVEWARNINGSCRIPT), &howLong, %Response.GetImageURL(Image.NEW_PS_LOGO), &timeoutWarningMsg, %Request.ResetTimeoutURL, %Response.GetImageURL(Image.PT_OK), MsgGetText(146, 95, "Please - note"), &domainScript);
&HTML = GetHTMLText(HTML.PT_TIMEOUTWARNING, PTGetStyleSheetURL(), %Response.GetJavaScriptURL(HTML.PT_SAVEWARNINGSCRIPT), &howLong, %Response.GetImageURL(Image.CSK_LOGO), &timeoutWarningMsg, %Request.ResetTimeoutURL, %Response.GetImageURL(Image.PT_OK), MsgGetText(146, 95, "Please - note"), &domainScript);
/* CSK - Timeout Warning Logo Customization - End */
%Response.Write(&HTML);
End-Function;
Notice that I commented the delivered line and replaced it with a custom line which references the custom logo image (Image.CSK_LOGO).
- Test Changes:

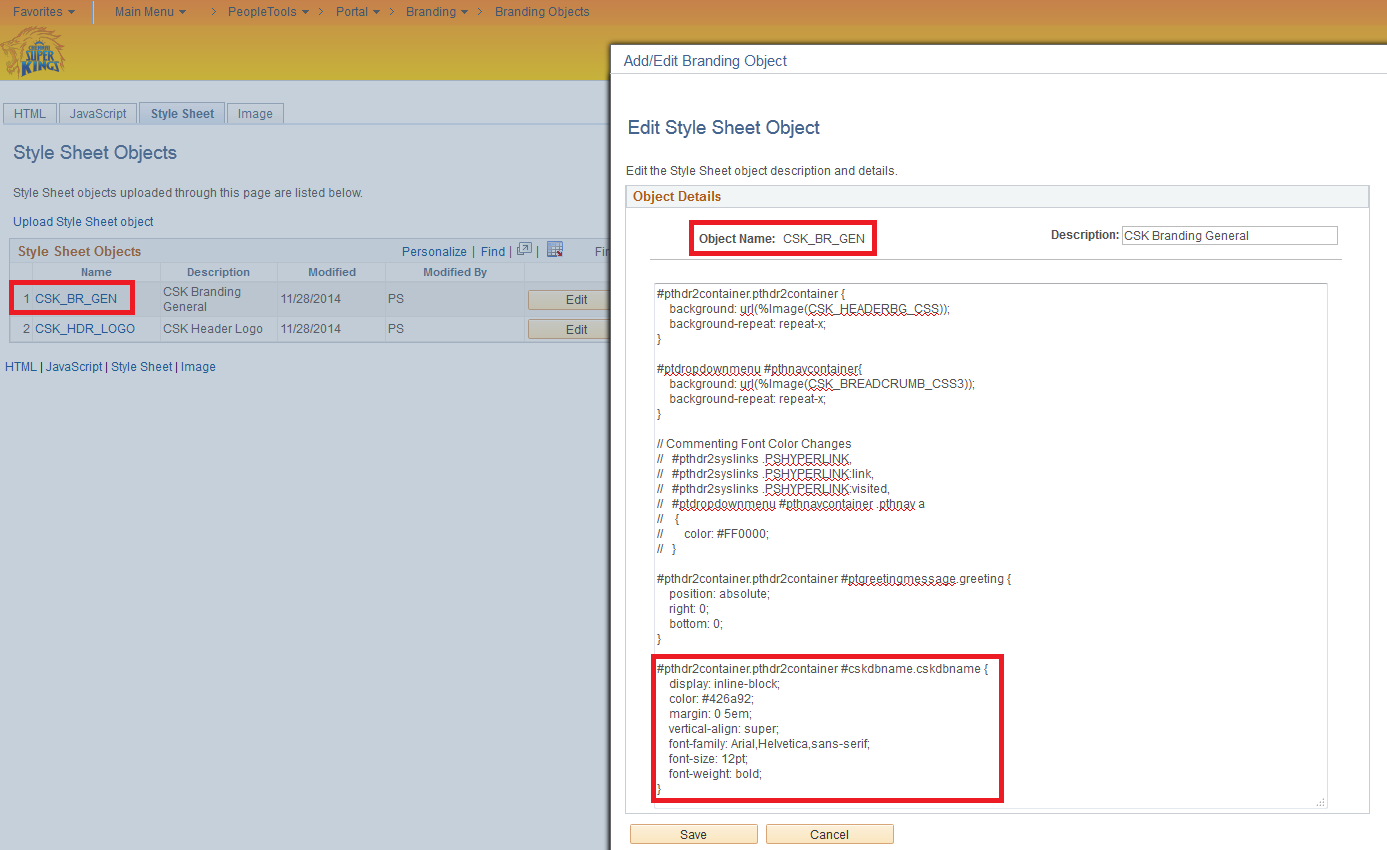
In this section we will examine how we can replace the delivered ptgreetingmessage Branding Element with a custom Branding Element.

We can see from the screenshot that the ptgreetingmessage element is using the Branding Element Type of Greeting Message.
The Branding Element Type Configuration can be found in the following navigation:
PeopleTools > Portal > Branding > System Data > Define Element Types

We can see that the delivered Greeting Message is being generated by the Application Class PTBR_BRANDING.SystemElements.GreetingText (review class implementation in App Designer to understand how the greeting message is generated).
Before we can go ahead and add a custom element (using a custom element type) to the Branding Header, we must create the custom branding element type and also develop the application class that supports this element type.
- Create Supporting Application Class for Custom Branding Element Type:
Create Custom Application Package.

Create Custom Application Class.
Note: The custom Application Class CSKGreetingText is cloned and improvised from PTBR_BRANDING.SystemElements.GreetingText.
import PTBR_BRANDING:Elements:BaseElement;
/**
* CSKGreetingText Class
*/
class CSKGreetingText extends PTBR_BRANDING:Elements:BaseElement
/* --- Properties --- */
/* --- Methods --- */
method CSKGreetingText(&pId As string);
method clone() Returns PTBR_BRANDING:Elements:BaseElement;
method getHTML(&pPreview As boolean) Returns string;
end-class;
/**
* Constructor
*
* @param pId ID of the object.
*
*/
method CSKGreetingText
/+ &pId as String +/
%Super = create PTBR_BRANDING:Elements:BaseElement(&pId);
%This.setElementType("CSKGreetingText");
rem %this.setAdvancedOptionsPage (Page.);
/* Initialize attributes */
%This.StyleClass = "cskgreeting";
end-method;
/**
* Make an exact copy of this object.
* NOTE: Only create the object here, do not copy any class properties.
* If there are new class properties, override the copyProperties
* method and do it there. Should invoke the %Super.copyProperties
* in that method though.
*
* @return BaseElement New object exactly matching this object.
*
*/
method clone
/+ Returns PTBR_BRANDING:Elements:BaseElement +/
/+ Extends/implements PTBR_BRANDING:Elements:BaseElement.clone +/
Local CSK_BRANDING:SystemElements:CSKGreetingText &newObj = create CSK_BRANDING:SystemElements:CSKGreetingText(%This.ID);
/* Call the copy properties function */
%This.copyProperties(&newObj);
Return &newObj;
end-method;
/**
* Get HTML of the element
*
* @param pPreview True - preview mode.
*
* @return String - HTML
*
*/
method getHTML
/+ &pPreview as Boolean +/
/+ Returns String +/
/+ Extends/implements PTBR_BRANDING:Elements:BaseElement.getHTML +/
Local string &getHTML = "";
Local ApiObject &portalObj;
If (&pPreview) Then
&getHTML = EscapeHTML(MsgGetText(25000, 3, "<message not found> Sample Greeting Text"));
Else
<* Commenting Delivered Greeting
&portalObj = %This.Utility.PortalRegistry;
If (All(&portalObj)) Then
&getHTML = EscapeHTML(&portalObj.Homepage.Greeting);
End-If;
*>
&getHTML = EscapeHTML("Welcome to CSK " | %UserDescription);
End-If;
&getHTML = GetHTMLText(HTML.PTBR_ELM_CONTAINER_SPAN, EscapeHTML(%This.ID), EscapeHTML(%This.StyleClass), &getHTML);
Return &getHTML;
end-method;
In the custom PeopleCode above, we have added logic to generate a dynamic and personalized greeting message that displays the text "Welcome to CSK " appended with the User's Description text using the %UserDescription system variable. Note: The type of greeting could vary significantly from organization to organization and this can be addressed appropriately in the getHTML method implementation.
- Create Custom Branding Element Type:
PeopleTools > Portal > Branding > System Data > Define Element Types

We can see in the screenshot that we are referencing our custom CSKGreetingText Application Class in the new Element Type (CSK_GREETING_TEXT).
- Create custom style for Custom Greeting Message:

#pthdr2container.pthdr2container #cskgreetingmessage.cskgreeting {
position: absolute;
right: 0;
bottom: 0;
color: #426a92;
font-family: Arial,Helvetica,sans-serif;
font-size: 12pt;
font-weight: normal;
}
- Delete delivered ptgreetingmessage element from the Branding Header:

- Add custom greeting element to the Branding Header:


- Test Changes:
Recommendations if you are experiencing caching issues:


We can see in the screenshot that some of the links on the Branding Header such as MultiChannel Console are not specifically useful for a majority of the users. Links such as Process Monitor and Report Monitor would be a lot more useful on the Branding Header (this requirement is well documented in the PeopleSoft Wiki blog post).
Let us see how we can remove the 'MultiChannel Console' link and add links to Process Monitor and Report Monitor on the header in PeopleTools 8.54.
- Create Custom Supporting Application Classes for Process Monitor and Report Monitor:

Application Class Implementation for Process Monitor:
Note: This Application Class was cloned and improvised from PTBR_BRANDING.SystemElements.WorklistLink Application Class.
import PT_BRANDING:HeaderLinkPIA;
import PTBR_BRANDING:Elements:BaseElement;
import PTBR_BRANDING:SystemElements:SystemLink;
import PTBR_BRANDING:UTILITY:Utility;
/**
* ProcessMonitorLink Class
*/
class ProcessMonitorLink extends PTBR_BRANDING:SystemElements:SystemLink
/* --- Properties --- */
/* --- Methods --- */
method ProcessMonitorLink(&pId As string);
method clone() Returns PTBR_BRANDING:Elements:BaseElement;
protected
/* --- Protected properties --- */
/* --- Protected Methods --- */
method setupLink(&pPreview As boolean);
private
/* --- Private Properties --- */
Constant &cstCTIConsole = "PopupCTIConsole();";
Constant &cstMCFConsole = "PopupMCFConsole();";
/* --- Private Methods --- */
end-class;
/**
* Constructor
*
* @param pId ID of the object.
*
*/
method ProcessMonitorLink
/+ &pId as String +/
%Super = create PTBR_BRANDING:SystemElements:SystemLink(&pId);
%This.setElementType("ProcessMonitorLink");
rem %this.setAdvancedOptionsPage (Page.);
/* Initialize attributes */
%This.Label.setMessageText(25000, 1, "Process Monitor");
end-method;
/**
* Make an exact copy of this object.
* NOTE: Only create the object here, do not copy any class properties.
* If there are new class properties, override the copyProperties
* method and do it there. Should invoke the %Super.copyProperties
* in that method though.
*
* @return BaseElement New object exactly matching this object.
*
*/
method clone
/+ Returns PTBR_BRANDING:Elements:BaseElement +/
/+ Extends/implements PTBR_BRANDING:SystemElements:SystemLink.clone +/
Local CSK_BRANDING:SystemElements:ProcessMonitorLink &newObj = create CSK_BRANDING:SystemElements:ProcessMonitorLink(%This.ID);
/* Call the copy properties function */
%This.copyProperties(&newObj);
Return &newObj;
end-method;
/*****************************
* Protected methods
*****************************/
/**
* Setup the link properties
*
*/
method setupLink
/+ &pPreview as Boolean +/
Local ApiObject &crefObj;
Local PTBR_BRANDING:UTILITY:Utility &utility = %This.Utility;
Local string &linkUrl = "";
If (&pPreview) Then
%Super.setupLink(&pPreview);
Else
&crefObj = &utility.PortalRegistry.FindCRefByName("PT_PROCESSMONITOR_GBL");
If (All(&crefObj) And
&crefObj.Authorized And
&crefObj.IsVisible) Then
If ((&utility.HeaderLink As PT_BRANDING:HeaderLinkPIA) <> Null) Then
&linkUrl = &crefObj.AbsolutePortalURL;
Else
&linkUrl = &crefObj.RelativeURL;
End-If;
%This.URL = &linkUrl;
End-If;
End-If;
end-method;
Application Class Implementation for Report Manager:
import PT_BRANDING:HeaderLinkPIA;
import PTBR_BRANDING:Elements:BaseElement;
import PTBR_BRANDING:SystemElements:SystemLink;
import PTBR_BRANDING:UTILITY:Utility;
/**
* ReportManagerLink Class
*/
class ReportManagerLink extends PTBR_BRANDING:SystemElements:SystemLink
/* --- Properties --- */
/* --- Methods --- */
method ReportManagerLink(&pId As string);
method clone() Returns PTBR_BRANDING:Elements:BaseElement;
protected
/* --- Protected properties --- */
/* --- Protected Methods --- */
method setupLink(&pPreview As boolean);
private
/* --- Private Properties --- */
Constant &cstCTIConsole = "PopupCTIConsole();";
Constant &cstMCFConsole = "PopupMCFConsole();";
/* --- Private Methods --- */
end-class;
/**
* Constructor
*
* @param pId ID of the object.
*
*/
method ReportManagerLink
/+ &pId as String +/
%Super = create PTBR_BRANDING:SystemElements:SystemLink(&pId);
%This.setElementType("ReportManagerLink");
rem %this.setAdvancedOptionsPage (Page.);
/* Initialize attributes */
%This.Label.setMessageText(25000, 2, "Report Manager");
end-method;
/**
* Make an exact copy of this object.
* NOTE: Only create the object here, do not copy any class properties.
* If there are new class properties, override the copyProperties
* method and do it there. Should invoke the %Super.copyProperties
* in that method though.
*
* @return BaseElement New object exactly matching this object.
*
*/
method clone
/+ Returns PTBR_BRANDING:Elements:BaseElement +/
/+ Extends/implements PTBR_BRANDING:SystemElements:SystemLink.clone +/
Local CSK_BRANDING:SystemElements:ReportManagerLink &newObj = create CSK_BRANDING:SystemElements:ReportManagerLink(%This.ID);
/* Call the copy properties function */
%This.copyProperties(&newObj);
Return &newObj;
end-method;
/*****************************
* Protected methods
*****************************/
/**
* Setup the link properties
*
*/
method setupLink
/+ &pPreview as Boolean +/
Local ApiObject &crefObj;
Local PTBR_BRANDING:UTILITY:Utility &utility = %This.Utility;
Local string &linkUrl = "";
If (&pPreview) Then
%Super.setupLink(&pPreview);
Else
&crefObj = &utility.PortalRegistry.FindCRefByName("PT_CONTENT_LIST_GBL");
If (All(&crefObj) And
&crefObj.Authorized And
&crefObj.IsVisible) Then
If ((&utility.HeaderLink As PT_BRANDING:HeaderLinkPIA) <> Null) Then
&linkUrl = &crefObj.AbsolutePortalURL;
Else
&linkUrl = &crefObj.RelativeURL;
End-If;
%This.URL = &linkUrl;
End-If;
End-If;
end-method;
- Create custom Branding Element Types for Process Monitor and Report Manager Links:


Note: Each Branding Element Type is referencing its corresponding custom supporting Application Class.
- Delete 'MultiChannel Console' and 'Performance Trace' links from Branding Header:


- Add Process Monitor and Report Monitor Elements to Branding Header:


- Test Changes:
Recommendations if you are experiencing caching issues:


Google Analytics is a free service that is offered by Google that helps us gather statistics on traffic, traffic sources, conversions, page visits and other useful information about websites.
There are some good presentations on the Higher Education User Group (HEUG) forum for more details on how organizations are using Google Analytics to track, monitor and analyze PIA traffic in PeopleSoft Applications.
To enable Google Analytics we need to create a new property using a google account. This would generate a tracking id that is specific to our website (property).
The tracking id is a string like UA-XXXXXX-Y where XXXXXX represents the account number and Y represents the property number.
Once we obtain the tracking id it is very easy to enable Google Analytics in a PeopleSoft Application. All we need to do is inject the Google Analytics javascript into our PeopleSoft Application.
Google Analytics JavaScript:
<script type="text/javascript">
var _gaq = _gaq || [];
_gaq.push(['_setAccount', 'UA-XXXXX-Y']);
_gaq.push(['_trackPageview']);
(function() {
var ga = document.createElement('script'); ga.type = 'text/javascript'; ga.async = true;
ga.src = ('https:' == document.location.protocol ? 'https://ssl' : 'http://www') + '.google-analytics.com/ga.js';
var s = document.getElementsByTagName('script')[0]; s.parentNode.insertBefore(ga, s);
})();
</script>
In the past (prior to PeopleTools 8.54), we would have had to insert the Google Analytics into our Branding Header or even at the template level (E.g.: PT_HNAV_TEMPLATE, PT_HNAV_TEMPLATE_INCLUDE).
With PeopleTools 8.54, it is very easy to inject JavaScript without any customizations.
- Create JavaScript Object for Google Analytics:

- Include Custom JavaScript Object on the Branding Systems Options Page:

Note: In this example, I am using the latest Asynchronous Syntax provided by Google which allows us to place/inject the JavaScript at any location (including the head) in the html without any page rendering performance issues.
- Test Changes:


Note: This post is only intended to provide information on how to implement Google Analytics in a PeopleSoft Application. This post does not cover details on how to use Google Analytics. There are several online resources that are available to understand the various ways to use the statistical data captured by Google Analytics both from a functional and technical point of view.
Over the three part series of blogs, we have seen how we can achieve several Branding requirements in PeopleTools 8.54. Now let us look at how we can migrate all the objects we created using both app designer and online configuration pages.
Let us take stock of all the objects that we created and include them in project for migration.
- Include all the Images created for Branding:


- Include all the Style Sheets created for Branding:


- Include all the JavaScript Objects created for Branding:


- Include any URL definitions created for Branding:

Note: This URL definition was used as the Hyperlink URL for the Logo Image (in Part 2).
- Include all Application Classes created for Branding:

- Include Weblib Customization for Timeout Warning:

- Include all Message Catalog Entries created for Branding:

Note: These message catalog entries are referenced in the Application Classes created for supporting Branding Element Types.
- Migrating configuration that are not PeopleTools Managed Objects:
In all the posts detailing Branding in 8.54 we have tried to use the Branding Configuration Pages wherever we could. This is great from a quick development turn around and maintenance point of view. But how do we migrate these configurations (themes, headers, footers, branding element types, etc)? These configurations are not PeopleTools Managed Objects (yet!).
To overcome this challenge, PeopleSoft has delivered export/import dms scripts for these configurations. The scripts can be found in the following location on the app server:
/$PS_HOME/scripts/
ptbr_setup_exp.dms
ptbr_setup_imp.dms
ptbr_theme_exp.dms
ptbr_theme_imp.dms

Migrating Branding Element Types and User Attribute Types:
Use ptbr_setup_exp.dms to export these configurations from the source environment and ptbr_setup_imp.dms to import these configurations to the target environment.
The main tables that store these configurations are:
PS_PTBR_ETYPE
PS_PTBR_ETYPE_LN
PS_PTBR_UATYPE
PS_PTBR_UATYPE_LN
In our examples we created 3 custom Branding Element Types for the following:
- Greeting Message
- Process Monitor Link
- Report Manager Link
Note: We will need to update the exports scripts appropriately to include our custom Branding Element Types.
E.g.:
EXPORT PS_PTBR_ETYPE WHERE PTBR_ETYPE_ID IN ('CSK_GREETING_TEXT', 'CSK_PROCESSMONITOR_LINK', 'CSK_REPORTMANAGER_LINK');
Migrating Themes, Header and Footer Definitions:
Use ptbr_theme_exp.dms to export these configurations from the source environment and ptbr_theme_imp.dms to import these configurations to the target environment.
The main tables that store these configurations are:
PS_PTBR_THEME
PS_PTBR_THEME_LN
PS_PTBR_THMATTR
PS_PTBR_THMATTR_LN
PS_PTBR_THEME_CSS
PS_PTBR_THEME_DEL
PS_PTBR_LAYOUT
PS_PTBR_LAYOUT_LN
PS_PTBR_LTATTR
PS_PTBR_LTATTR_LN
PS_PTBR_LTELT
PS_PTBR_LTELT_LN
PS_PTBR_LTELTAT
PS_PTBR_LTELTAT_LN
In our examples we created a custom Theme and a custom Header Definition.
Note: We will need to update the exports scripts appropriately to include our custom Branding Definitions.
E.g.:
-- Export theme definitions
EXPORT PS_PTBR_THEME WHERE PTBR_THEME_ID IN ('CSK_THEME_TANGERINE');
-- EXPORT PS_PTBR_THEME_LN WHERE PTBR_THEME_ID IN ('CSK_THEME_TANGERINE');
EXPORT PS_PTBR_THMATTR WHERE PTBR_THEME_ID IN ('CSK_THEME_TANGERINE');
-- EXPORT PS_PTBR_THMATTR_LN WHERE PTBR_THEME_ID IN ('CSK_THEME_TANGERINE');
EXPORT PS_PTBR_THEME_CSS WHERE PTBR_THEME_ID IN ('CSK_THEME_TANGERINE');
EXPORT PS_PTBR_THEME_DEL WHERE PTBR_THEME_ID IN ('CSK_THEME_TANGERINE');
-- Export header/footer definitions
EXPORT PS_PTBR_LAYOUT WHERE PTBR_LAYOUT_ID IN ('CSK_HEADER_TANGERINE');
-- EXPORT PS_PTBR_LAYOUT_LN WHERE PTBR_LAYOUT_ID IN ('CSK_HEADER_TANGERINE');
EXPORT PS_PTBR_LTATTR WHERE PTBR_LAYOUT_ID IN ('CSK_HEADER_TANGERINE');
-- EXPORT PS_PTBR_LTATTR_LN WHERE PTBR_LAYOUT_ID IN ('CSK_HEADER_TANGERINE');
EXPORT PS_PTBR_LTELT WHERE PTBR_LAYOUT_ID IN ('CSK_HEADER_TANGERINE');
-- EXPORT PS_PTBR_LTELT_LN WHERE PTBR_LAYOUT_ID IN ('CSK_HEADER_TANGERINE');
EXPORT PS_PTBR_LTELTAT WHERE PTBR_LAYOUT_ID IN ('CSK_HEADER_TANGERINE');
-- EXPORT PS_PTBR_LTELTAT_LN WHERE PTBR_LAYOUT_ID IN ('CSK_HEADER_TANGERINE');

Part 1 detailed the basics of what's new with Branding in PeopleTools 8.54 and provided steps to change the logo of the application. Part 2 detailed steps to achieve several common branding requirements such as changing the background color of the branding header, changing the background color and the font color of the Navigation Drop-Down Menu, changing the font color of the Branding System Links, adding a hyperlink to the Branding Logo, moving branding elements (div) using css and adding database name to the Branding Header. We were able to perform all these tasks simply by using the online configuration pages for Branding provided as part of PeopleTools 8.54.
In this post we will dive into some of the more advanced Branding requirements that may potentially require the use of Application Designer.
Branding the Timeout Popup Warning Message:

What is this popup and where is it coming from? This popup message is the PeopleSoft delivered Timeout Warning Message that is displayed to warn the user of an impending timeout of their session (due to inactivity).
If we examine the URL of this Popup message we can see that it is generated by an IScript.
http://pt854.hcm92.com:8000/psc/ps/EMPLOYEE/HRMS/s/WEBLIB_TIMEOUT.PT_TIMEOUTWARNING.FieldFormula.IScript_TIMEOUTWARNING
This IScript is configured on the web profile which is currently being used by the web server.
PeopleTools > Web Profile > Web Profile Configuration (Security Tab)

In the screenshot above, we can see the configuration that triggers this popup message. A handy tip while testing changes to the timeout warning is to change the "Inactivity Warning" seconds to a shorter period like 120 or 180 seconds. This helps in triggering the popup without having to wait for extended periods of time (Note: Any changes to the web profile requires a reboot of the web server to take effect).
As this popup is generated through an IScript, I don't see a way we can override the Oracle Logo on the popup by overriding the stylesheet or by using other Branding Configuration.
There are two ways we can go about this customization:
1. Create a custom IScript that is a clone of the delivered IScript and then perform all customizations in the custom IScript. This option requires us to update the Web Profile to Override the Timout Warning Script to reference our custom IScript.
2. Simply customize the delivered IScript.
For the purposes of this post, I would be customizing the delivered IScript (second option) because I just want to replace the Oracle Logo with my custom logo.
- Update Timeout Warning IScript:
Open IScript Record PeopleCode using App Designer.

Change the reference to the Oracle Logo (Image.NEW_PS_LOGO) to use Custom Logo.
Customized Timout Warning IScript Code:
Declare Function SetDocDomainForPortal PeopleCode FUNCLIB_PORTAL.TEMPLATE_FUNC FieldFormula;
Declare Function PTGetStyleSheetURL PeopleCode FUNCLIB_PORTAL.PORTAL_GEN_FUNC FieldFormula;
Function IScript_TIMEOUTWARNING()
&howLong = %Request.Timeout * 1000 - %Request.WarningTimeout * 1000 - 2000;
&timeoutWarningMsg = MsgGetText(146, 91, "Your session is about to be timed out. As a security precaution, sessions end after ");
&timeoutWarningMsg = &timeoutWarningMsg | " " | Integer(%Request.Timeout / 60) | " " | MsgGetText(146, 92, "minutes of inactivity. Click OK to continue your current session.");
&domainScript = SetDocDomainForPortal();
/* CSK - Timeout Warning Logo Customization - Start */
rem commenting delivered code &HTML = GetHTMLText(HTML.PT_TIMEOUTWARNING, PTGetStyleSheetURL(), %Response.GetJavaScriptURL(HTML.PT_SAVEWARNINGSCRIPT), &howLong, %Response.GetImageURL(Image.NEW_PS_LOGO), &timeoutWarningMsg, %Request.ResetTimeoutURL, %Response.GetImageURL(Image.PT_OK), MsgGetText(146, 95, "Please - note"), &domainScript);
&HTML = GetHTMLText(HTML.PT_TIMEOUTWARNING, PTGetStyleSheetURL(), %Response.GetJavaScriptURL(HTML.PT_SAVEWARNINGSCRIPT), &howLong, %Response.GetImageURL(Image.CSK_LOGO), &timeoutWarningMsg, %Request.ResetTimeoutURL, %Response.GetImageURL(Image.PT_OK), MsgGetText(146, 95, "Please - note"), &domainScript);
/* CSK - Timeout Warning Logo Customization - End */
%Response.Write(&HTML);
End-Function;
Notice that I commented the delivered line and replaced it with a custom line which references the custom logo image (Image.CSK_LOGO).
- Test Changes:

Display Dynamic and User Specific Greeting Message using Custom Branding Elements:
In this section we will examine how we can replace the delivered ptgreetingmessage Branding Element with a custom Branding Element.

We can see from the screenshot that the ptgreetingmessage element is using the Branding Element Type of Greeting Message.
The Branding Element Type Configuration can be found in the following navigation:
PeopleTools > Portal > Branding > System Data > Define Element Types

We can see that the delivered Greeting Message is being generated by the Application Class PTBR_BRANDING.SystemElements.GreetingText (review class implementation in App Designer to understand how the greeting message is generated).
Before we can go ahead and add a custom element (using a custom element type) to the Branding Header, we must create the custom branding element type and also develop the application class that supports this element type.
- Create Supporting Application Class for Custom Branding Element Type:
Create Custom Application Package.

Create Custom Application Class.
Note: The custom Application Class CSKGreetingText is cloned and improvised from PTBR_BRANDING.SystemElements.GreetingText.
import PTBR_BRANDING:Elements:BaseElement;
/**
* CSKGreetingText Class
*/
class CSKGreetingText extends PTBR_BRANDING:Elements:BaseElement
/* --- Properties --- */
/* --- Methods --- */
method CSKGreetingText(&pId As string);
method clone() Returns PTBR_BRANDING:Elements:BaseElement;
method getHTML(&pPreview As boolean) Returns string;
end-class;
/**
* Constructor
*
* @param pId ID of the object.
*
*/
method CSKGreetingText
/+ &pId as String +/
%Super = create PTBR_BRANDING:Elements:BaseElement(&pId);
%This.setElementType("CSKGreetingText");
rem %this.setAdvancedOptionsPage (Page.);
/* Initialize attributes */
%This.StyleClass = "cskgreeting";
end-method;
/**
* Make an exact copy of this object.
* NOTE: Only create the object here, do not copy any class properties.
* If there are new class properties, override the copyProperties
* method and do it there. Should invoke the %Super.copyProperties
* in that method though.
*
* @return BaseElement New object exactly matching this object.
*
*/
method clone
/+ Returns PTBR_BRANDING:Elements:BaseElement +/
/+ Extends/implements PTBR_BRANDING:Elements:BaseElement.clone +/
Local CSK_BRANDING:SystemElements:CSKGreetingText &newObj = create CSK_BRANDING:SystemElements:CSKGreetingText(%This.ID);
/* Call the copy properties function */
%This.copyProperties(&newObj);
Return &newObj;
end-method;
/**
* Get HTML of the element
*
* @param pPreview True - preview mode.
*
* @return String - HTML
*
*/
method getHTML
/+ &pPreview as Boolean +/
/+ Returns String +/
/+ Extends/implements PTBR_BRANDING:Elements:BaseElement.getHTML +/
Local string &getHTML = "";
Local ApiObject &portalObj;
If (&pPreview) Then
&getHTML = EscapeHTML(MsgGetText(25000, 3, "<message not found> Sample Greeting Text"));
Else
<* Commenting Delivered Greeting
&portalObj = %This.Utility.PortalRegistry;
If (All(&portalObj)) Then
&getHTML = EscapeHTML(&portalObj.Homepage.Greeting);
End-If;
*>
&getHTML = EscapeHTML("Welcome to CSK " | %UserDescription);
End-If;
&getHTML = GetHTMLText(HTML.PTBR_ELM_CONTAINER_SPAN, EscapeHTML(%This.ID), EscapeHTML(%This.StyleClass), &getHTML);
Return &getHTML;
end-method;
In the custom PeopleCode above, we have added logic to generate a dynamic and personalized greeting message that displays the text "Welcome to CSK " appended with the User's Description text using the %UserDescription system variable. Note: The type of greeting could vary significantly from organization to organization and this can be addressed appropriately in the getHTML method implementation.
- Create Custom Branding Element Type:
PeopleTools > Portal > Branding > System Data > Define Element Types

We can see in the screenshot that we are referencing our custom CSKGreetingText Application Class in the new Element Type (CSK_GREETING_TEXT).
- Create custom style for Custom Greeting Message:

#pthdr2container.pthdr2container #cskgreetingmessage.cskgreeting {
position: absolute;
right: 0;
bottom: 0;
color: #426a92;
font-family: Arial,Helvetica,sans-serif;
font-size: 12pt;
font-weight: normal;
}
- Delete delivered ptgreetingmessage element from the Branding Header:

- Add custom greeting element to the Branding Header:


- Test Changes:
Recommendations if you are experiencing caching issues:
- Clear local browser cache.
- Shutdown, purge cache and reboot the web server(s).


Adding Custom Links to the Branding Header System Links:

We can see in the screenshot that some of the links on the Branding Header such as MultiChannel Console are not specifically useful for a majority of the users. Links such as Process Monitor and Report Monitor would be a lot more useful on the Branding Header (this requirement is well documented in the PeopleSoft Wiki blog post).
Let us see how we can remove the 'MultiChannel Console' link and add links to Process Monitor and Report Monitor on the header in PeopleTools 8.54.
- Create Custom Supporting Application Classes for Process Monitor and Report Monitor:

Application Class Implementation for Process Monitor:
Note: This Application Class was cloned and improvised from PTBR_BRANDING.SystemElements.WorklistLink Application Class.
import PT_BRANDING:HeaderLinkPIA;
import PTBR_BRANDING:Elements:BaseElement;
import PTBR_BRANDING:SystemElements:SystemLink;
import PTBR_BRANDING:UTILITY:Utility;
/**
* ProcessMonitorLink Class
*/
class ProcessMonitorLink extends PTBR_BRANDING:SystemElements:SystemLink
/* --- Properties --- */
/* --- Methods --- */
method ProcessMonitorLink(&pId As string);
method clone() Returns PTBR_BRANDING:Elements:BaseElement;
protected
/* --- Protected properties --- */
/* --- Protected Methods --- */
method setupLink(&pPreview As boolean);
private
/* --- Private Properties --- */
Constant &cstCTIConsole = "PopupCTIConsole();";
Constant &cstMCFConsole = "PopupMCFConsole();";
/* --- Private Methods --- */
end-class;
/**
* Constructor
*
* @param pId ID of the object.
*
*/
method ProcessMonitorLink
/+ &pId as String +/
%Super = create PTBR_BRANDING:SystemElements:SystemLink(&pId);
%This.setElementType("ProcessMonitorLink");
rem %this.setAdvancedOptionsPage (Page.);
/* Initialize attributes */
%This.Label.setMessageText(25000, 1, "Process Monitor");
end-method;
/**
* Make an exact copy of this object.
* NOTE: Only create the object here, do not copy any class properties.
* If there are new class properties, override the copyProperties
* method and do it there. Should invoke the %Super.copyProperties
* in that method though.
*
* @return BaseElement New object exactly matching this object.
*
*/
method clone
/+ Returns PTBR_BRANDING:Elements:BaseElement +/
/+ Extends/implements PTBR_BRANDING:SystemElements:SystemLink.clone +/
Local CSK_BRANDING:SystemElements:ProcessMonitorLink &newObj = create CSK_BRANDING:SystemElements:ProcessMonitorLink(%This.ID);
/* Call the copy properties function */
%This.copyProperties(&newObj);
Return &newObj;
end-method;
/*****************************
* Protected methods
*****************************/
/**
* Setup the link properties
*
*/
method setupLink
/+ &pPreview as Boolean +/
Local ApiObject &crefObj;
Local PTBR_BRANDING:UTILITY:Utility &utility = %This.Utility;
Local string &linkUrl = "";
If (&pPreview) Then
%Super.setupLink(&pPreview);
Else
&crefObj = &utility.PortalRegistry.FindCRefByName("PT_PROCESSMONITOR_GBL");
If (All(&crefObj) And
&crefObj.Authorized And
&crefObj.IsVisible) Then
If ((&utility.HeaderLink As PT_BRANDING:HeaderLinkPIA) <> Null) Then
&linkUrl = &crefObj.AbsolutePortalURL;
Else
&linkUrl = &crefObj.RelativeURL;
End-If;
%This.URL = &linkUrl;
End-If;
End-If;
end-method;
Application Class Implementation for Report Manager:
import PT_BRANDING:HeaderLinkPIA;
import PTBR_BRANDING:Elements:BaseElement;
import PTBR_BRANDING:SystemElements:SystemLink;
import PTBR_BRANDING:UTILITY:Utility;
/**
* ReportManagerLink Class
*/
class ReportManagerLink extends PTBR_BRANDING:SystemElements:SystemLink
/* --- Properties --- */
/* --- Methods --- */
method ReportManagerLink(&pId As string);
method clone() Returns PTBR_BRANDING:Elements:BaseElement;
protected
/* --- Protected properties --- */
/* --- Protected Methods --- */
method setupLink(&pPreview As boolean);
private
/* --- Private Properties --- */
Constant &cstCTIConsole = "PopupCTIConsole();";
Constant &cstMCFConsole = "PopupMCFConsole();";
/* --- Private Methods --- */
end-class;
/**
* Constructor
*
* @param pId ID of the object.
*
*/
method ReportManagerLink
/+ &pId as String +/
%Super = create PTBR_BRANDING:SystemElements:SystemLink(&pId);
%This.setElementType("ReportManagerLink");
rem %this.setAdvancedOptionsPage (Page.);
/* Initialize attributes */
%This.Label.setMessageText(25000, 2, "Report Manager");
end-method;
/**
* Make an exact copy of this object.
* NOTE: Only create the object here, do not copy any class properties.
* If there are new class properties, override the copyProperties
* method and do it there. Should invoke the %Super.copyProperties
* in that method though.
*
* @return BaseElement New object exactly matching this object.
*
*/
method clone
/+ Returns PTBR_BRANDING:Elements:BaseElement +/
/+ Extends/implements PTBR_BRANDING:SystemElements:SystemLink.clone +/
Local CSK_BRANDING:SystemElements:ReportManagerLink &newObj = create CSK_BRANDING:SystemElements:ReportManagerLink(%This.ID);
/* Call the copy properties function */
%This.copyProperties(&newObj);
Return &newObj;
end-method;
/*****************************
* Protected methods
*****************************/
/**
* Setup the link properties
*
*/
method setupLink
/+ &pPreview as Boolean +/
Local ApiObject &crefObj;
Local PTBR_BRANDING:UTILITY:Utility &utility = %This.Utility;
Local string &linkUrl = "";
If (&pPreview) Then
%Super.setupLink(&pPreview);
Else
&crefObj = &utility.PortalRegistry.FindCRefByName("PT_CONTENT_LIST_GBL");
If (All(&crefObj) And
&crefObj.Authorized And
&crefObj.IsVisible) Then
If ((&utility.HeaderLink As PT_BRANDING:HeaderLinkPIA) <> Null) Then
&linkUrl = &crefObj.AbsolutePortalURL;
Else
&linkUrl = &crefObj.RelativeURL;
End-If;
%This.URL = &linkUrl;
End-If;
End-If;
end-method;
- Create custom Branding Element Types for Process Monitor and Report Manager Links:


Note: Each Branding Element Type is referencing its corresponding custom supporting Application Class.
- Delete 'MultiChannel Console' and 'Performance Trace' links from Branding Header:


- Add Process Monitor and Report Monitor Elements to Branding Header:


- Test Changes:
Recommendations if you are experiencing caching issues:
- Clear local browser cache.
- Shutdown, purge cache and reboot the web server(s).


Implementing Google Analytics:
Google Analytics is a free service that is offered by Google that helps us gather statistics on traffic, traffic sources, conversions, page visits and other useful information about websites.
There are some good presentations on the Higher Education User Group (HEUG) forum for more details on how organizations are using Google Analytics to track, monitor and analyze PIA traffic in PeopleSoft Applications.
To enable Google Analytics we need to create a new property using a google account. This would generate a tracking id that is specific to our website (property).
The tracking id is a string like UA-XXXXXX-Y where XXXXXX represents the account number and Y represents the property number.
Once we obtain the tracking id it is very easy to enable Google Analytics in a PeopleSoft Application. All we need to do is inject the Google Analytics javascript into our PeopleSoft Application.
Google Analytics JavaScript:
<script type="text/javascript">
var _gaq = _gaq || [];
_gaq.push(['_setAccount', 'UA-XXXXX-Y']);
_gaq.push(['_trackPageview']);
(function() {
var ga = document.createElement('script'); ga.type = 'text/javascript'; ga.async = true;
ga.src = ('https:' == document.location.protocol ? 'https://ssl' : 'http://www') + '.google-analytics.com/ga.js';
var s = document.getElementsByTagName('script')[0]; s.parentNode.insertBefore(ga, s);
})();
</script>
In the past (prior to PeopleTools 8.54), we would have had to insert the Google Analytics into our Branding Header or even at the template level (E.g.: PT_HNAV_TEMPLATE, PT_HNAV_TEMPLATE_INCLUDE).
With PeopleTools 8.54, it is very easy to inject JavaScript without any customizations.
- Create JavaScript Object for Google Analytics:

- Include Custom JavaScript Object on the Branding Systems Options Page:

Note: In this example, I am using the latest Asynchronous Syntax provided by Google which allows us to place/inject the JavaScript at any location (including the head) in the html without any page rendering performance issues.
- Test Changes:


Note: This post is only intended to provide information on how to implement Google Analytics in a PeopleSoft Application. This post does not cover details on how to use Google Analytics. There are several online resources that are available to understand the various ways to use the statistical data captured by Google Analytics both from a functional and technical point of view.
Migrating Branding to other environments:
Over the three part series of blogs, we have seen how we can achieve several Branding requirements in PeopleTools 8.54. Now let us look at how we can migrate all the objects we created using both app designer and online configuration pages.
Let us take stock of all the objects that we created and include them in project for migration.
- Include all the Images created for Branding:


- Include all the Style Sheets created for Branding:


- Include all the JavaScript Objects created for Branding:


- Include any URL definitions created for Branding:

Note: This URL definition was used as the Hyperlink URL for the Logo Image (in Part 2).
- Include all Application Classes created for Branding:

- Include Weblib Customization for Timeout Warning:
- Include all Message Catalog Entries created for Branding:

Note: These message catalog entries are referenced in the Application Classes created for supporting Branding Element Types.
- Migrating configuration that are not PeopleTools Managed Objects:
In all the posts detailing Branding in 8.54 we have tried to use the Branding Configuration Pages wherever we could. This is great from a quick development turn around and maintenance point of view. But how do we migrate these configurations (themes, headers, footers, branding element types, etc)? These configurations are not PeopleTools Managed Objects (yet!).
To overcome this challenge, PeopleSoft has delivered export/import dms scripts for these configurations. The scripts can be found in the following location on the app server:
/$PS_HOME/scripts/
ptbr_setup_exp.dms
ptbr_setup_imp.dms
ptbr_theme_exp.dms
ptbr_theme_imp.dms

Migrating Branding Element Types and User Attribute Types:
Use ptbr_setup_exp.dms to export these configurations from the source environment and ptbr_setup_imp.dms to import these configurations to the target environment.
The main tables that store these configurations are:
PS_PTBR_ETYPE
PS_PTBR_ETYPE_LN
PS_PTBR_UATYPE
PS_PTBR_UATYPE_LN
In our examples we created 3 custom Branding Element Types for the following:
- Greeting Message
- Process Monitor Link
- Report Manager Link
Note: We will need to update the exports scripts appropriately to include our custom Branding Element Types.
E.g.:
EXPORT PS_PTBR_ETYPE WHERE PTBR_ETYPE_ID IN ('CSK_GREETING_TEXT', 'CSK_PROCESSMONITOR_LINK', 'CSK_REPORTMANAGER_LINK');
Migrating Themes, Header and Footer Definitions:
Use ptbr_theme_exp.dms to export these configurations from the source environment and ptbr_theme_imp.dms to import these configurations to the target environment.
The main tables that store these configurations are:
PS_PTBR_THEME
PS_PTBR_THEME_LN
PS_PTBR_THMATTR
PS_PTBR_THMATTR_LN
PS_PTBR_THEME_CSS
PS_PTBR_THEME_DEL
PS_PTBR_LAYOUT
PS_PTBR_LAYOUT_LN
PS_PTBR_LTATTR
PS_PTBR_LTATTR_LN
PS_PTBR_LTELT
PS_PTBR_LTELT_LN
PS_PTBR_LTELTAT
PS_PTBR_LTELTAT_LN
In our examples we created a custom Theme and a custom Header Definition.
Note: We will need to update the exports scripts appropriately to include our custom Branding Definitions.
E.g.:
-- Export theme definitions
EXPORT PS_PTBR_THEME WHERE PTBR_THEME_ID IN ('CSK_THEME_TANGERINE');
-- EXPORT PS_PTBR_THEME_LN WHERE PTBR_THEME_ID IN ('CSK_THEME_TANGERINE');
EXPORT PS_PTBR_THMATTR WHERE PTBR_THEME_ID IN ('CSK_THEME_TANGERINE');
-- EXPORT PS_PTBR_THMATTR_LN WHERE PTBR_THEME_ID IN ('CSK_THEME_TANGERINE');
EXPORT PS_PTBR_THEME_CSS WHERE PTBR_THEME_ID IN ('CSK_THEME_TANGERINE');
EXPORT PS_PTBR_THEME_DEL WHERE PTBR_THEME_ID IN ('CSK_THEME_TANGERINE');
-- Export header/footer definitions
EXPORT PS_PTBR_LAYOUT WHERE PTBR_LAYOUT_ID IN ('CSK_HEADER_TANGERINE');
-- EXPORT PS_PTBR_LAYOUT_LN WHERE PTBR_LAYOUT_ID IN ('CSK_HEADER_TANGERINE');
EXPORT PS_PTBR_LTATTR WHERE PTBR_LAYOUT_ID IN ('CSK_HEADER_TANGERINE');
-- EXPORT PS_PTBR_LTATTR_LN WHERE PTBR_LAYOUT_ID IN ('CSK_HEADER_TANGERINE');
EXPORT PS_PTBR_LTELT WHERE PTBR_LAYOUT_ID IN ('CSK_HEADER_TANGERINE');
-- EXPORT PS_PTBR_LTELT_LN WHERE PTBR_LAYOUT_ID IN ('CSK_HEADER_TANGERINE');
EXPORT PS_PTBR_LTELTAT WHERE PTBR_LAYOUT_ID IN ('CSK_HEADER_TANGERINE');
-- EXPORT PS_PTBR_LTELTAT_LN WHERE PTBR_LAYOUT_ID IN ('CSK_HEADER_TANGERINE');
Message Catalog Entries created for Reference: